


How to create a
new volume
This option creates a new
volume from the unallocated space on one or more disks. A volume is a portion
of one
or more hard disks configured to store data on the HP Media Vault. Volumes can be a defined as part of a disk
or an entire disk. You configure the
size of a volume.
To create a new volume on a
hard disk that has all of its space already allocated to a volume, you must
first
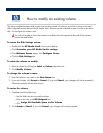
resize the established volume to create unallocated space. (To resize volumes, see
Modify an existing volume
.)
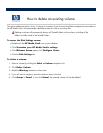
To access the Disk Settings screen:
Double
-
click the
HP Media Vault
icon on your desktop.
Click
Customize your HP Media Vault
’
s settings
.
If the
Welcome Screen
appears, click
Configure Device
.
Click the
Disk Settings
tab.
To create a new volume:
1. Click
Create New Volume
.
2.
Enter the new volume
’
s name in the
New Volume Name
box.
Note:
If the next two options are dimmed, the hard disk is already formatted
and you can proceed to
step
4.
3.
Select one of the following format types:
Disk is dedicated for permanent use on this device. Format for best
performance (Reiser).
This option will format the disk
into a proprietary Linux file system (a
modified form of ReiserFS). Formatting the disk using this file system does not allow the disk to be
disconnected from the media vault and used on another computer
—
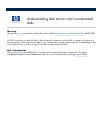
even a Linux computer. See
Understanding file systems for formatting hard disks
.
Disk may be disconnected from NAS and connected to a computer.
Format for
maximum portability (FAT32).
This option will format the disk using the FAT32 file system.
Formatting the disk using this file system will allow you to disconnect the hard
drive from the media
vault and use it on another computer. See
Understanding file systems for formatting hard disks
.
4.
Assign a size to the new volume by completing one of the following:
Use the slider arrows to resize the volume.
Enter a new size in the
GB Assigned
box.
Click
Assign All Available Space to this Volume
.
5. Click
Accept
or
Cancel
. If you click
Cancel
, your new volume will not be created.