


EN Introduction 14-1
14
PCL Rectangular
Area Fill Graphics
Introduction
The PCL language includes commands for filling or shading
rectangular areas on the page with pre-defined patterns, and
allows creation and use of user-defined patterns. Pre-defined
patterns include eight shading patterns and six cross-hatch
patterns.
Note User-defined patterns are not supported on all LaserJet family
printers. Refer to the “PCL Feature Support Matrix” in the PCL 5
Comparison Guide.
The first step in filling an area, if using a user-defined pattern,
is to download the pattern (see Chapter 13). Next, position the
cursor (using cursor move commands) and specify the dimension
of the area (using the horizontal and vertical rectangle size
commands). The cursor identifies the upper left corner of the
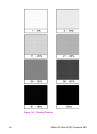
rectangular fill area. Once the rectangle size and position are
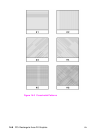
identified, select the specific pattern (shading level (Figure
14-1), cross-hatch pattern (Figure 14-2), or user-defined
pattern), to be used for filling the rectangular area. Finally the
command is issued to fill the defined rectangular area. Once a
user-defined pattern has been downloaded, the fill procedure
can be repeated as often as required.
Rectangular Area Fill Procedure
1 For user-defined patterns: if you have not done so already,
download the binary pattern data (User-Defined Pattern
Command -
E
C
*c#W - Chapter 13).
2 Position the cursor (choice of various cursor commands -
Chapter 6).