


101
Editing
Arranging the order of
scenes in the Playlist
(Edit)
Renaming the title of
a Playlist (Title)
When a Playlist is created, its title is
automatically generated from the date,
time, and sequential number of
creation.
You can rename the title as many
times as you like.
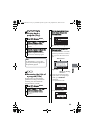
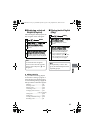
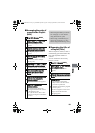
1
Press , then press
MENU
.
2
Select “PlayList” “Select”, then
press the confirmation button.
The “Select PlayList” screen
appears.
3
Select the playlist you want to edit,
then press the confirmation button.
The targeted playlist screen
appears.
4
Select the scene you want to move,
then press
MENU
.
You can also select multiple
scenes (p.49).
5
Select “Scene” “Edit” “Move”,
then press the confirmation button.
The “Move Scene” screen appears.
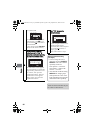
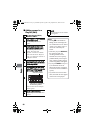
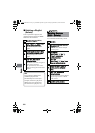
6
If you do not need to change the
scene(s), press the confirmation
button.
7
Select the position where you wish to
move the scene, then press the
confirmation button.
The confirmation screen appears.
8
Select “YES”, then press the
confirmation button.
The scenes of the playlist are
rearranged and the screen returns
to the playlist screen.
• To quit the move, select “NO”
before pressing the confirmation
button.
Notes
• When using the HDD, you need to
set “Category” to “All” before
using this function (p.86).
• When using a DVD-RAM, you
need to set “Category” to “All”
before using this function (p.114).
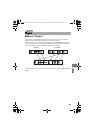
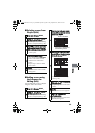
1
Press , then press
MENU
.
2
Select “PlayList” “Title”, then press
the confirmation button.
The “PlayList Title” screen
appears.
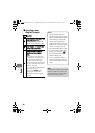
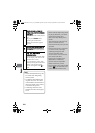
3
Select the playlist whose title you wish
to change, then press the confirmation
button.
4
Rename the title.
• The method to rename the
Playlist title is the same as the
procedure explained in
"Renaming the title of a program
(Title)" (p.93).
The disc navigation screen of the
Playlist whose title has been
changed appears.
DZ-HS903-803-US-Ea_IM_v01d05n02.p.book Page 101 Friday, September 12, 2008 8:22 PM