


5
7. SHOOTING OPERATION
7-1 Basic Recording Operation...................................... 54
7-2 Searching for Recorded Scenes (Edit Search)........ 56
7-3 If the Record-Standby Mode Continues................... 57
7-4 Checking Recorded Contents in Record-Standby
Mode (Recording Check Function) .......................... 57
7-5 HEADER REC Function........................................... 58
7-6 Recording the Color Bars......................................... 60
8. PLAYBACK MODE
8-1 Playback Procedure................................................. 61
8-2 Fast-Forward, Rewind.............................................. 62
8-3 Search...................................................................... 62
8-4 Blank Search............................................................ 62
8-5 Variable Slow Playback............................................ 63
8-6 Outputting CH-3, CH-4 Channel Audio .................... 64
APPLICATION
9. USING EXTERNAL COMPONENTS
9-1 Connecting a Video Component with
DV Connector .......................................................... 65
10. TIME CODE OPERATION
10-1 Displaying Time Code .............................................. 67
10-2 Presetting and Recording of Time Code .................. 68
10-3 Recording Time Codes in Continuation of Time
Codes Recorded on Tape ........................................ 70
10-4 Reproducing Time Codes......................................... 70
11. MENU SCREENS
11-1 Menu Screen Configuration ..................................... 71
11-2 Setting Menu Screens.............................................. 72
11-3 FILE MANAGE Menu Screen................................... 73
11-4 TOP MENU Screen.................................................. 74
11-5 CAMERA OPERATION Menu Screen...................... 75
11-6 CAMERA PROCESS MENU Screen ....................... 76
11-7 ADVANCED PROCESS Screen .............................. 78
11-8 SKIN COLOR ADJUST Screen............................... 79
11-9 AUDIO/VIDEO Menu Screen................................... 79
11-10
LCD/VF Menu Screen.............................................. 81
11-11
TC/UB/CLOCK Menu Screen................................... 83
11-12
HEADER REC Menu Screen ................................... 84
11-13
TIME/DATE Menu Screen........................................ 85
11-14
OTHERS Menu Screen............................................ 86
12. FEATURES OF THE CAMERA SECTION
12-1 Full-Time Auto White Balance (FAW)....................... 88
12-2 IRIS (Brightness) Adjustment................................... 89
12-3 Adjusting the Shutter Speed .................................... 90
12-4 Shooting the Screen Image on a Computer
Monitor ..................................................................... 91
12-5 Gain (Sensitivity) Adjustment ................................... 92
12-6 Switch Setup According to Illumination
and Subject .............................................................. 93
12-7 How to Use Skin Detail ............................................ 94
OTHERS
13. OTHERS
13-1 Alarm Indications and Actions.................................. 96
13-2 Troubleshooting ....................................................... 99
13-3 Hour Meter Display ................................................ 100
13-4 Specifications ......................................................... 101
INTRODUCTION
MAIN FEATURES ............................................................... 4
CONTENTS ........................................................................ 5
1. INTRODUCTION
1-1 Precautions for Proper Use........................................ 6
1-2 Routine and Periodical Maintenance......................... 7
1-3 Precautions for Use of Head Cleaning Tape .............. 7
1-4 Videocassette to be Used.......................................... 8
1-5 Battery Pack to be Used ............................................ 8
1-6 Condensation............................................................. 9
1-7 Characteristic CCD Phenomena................................ 9
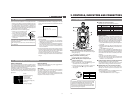
2. CONTROLS, INDICATORS AND CONNECTORS
2-1 Front Section............................................................ 10
2-2 Right Side Section.................................................... 12
2-3 Left Side Section...................................................... 17
2-4 Top Section .............................................................. 18
2-5 Rear Section ............................................................ 19
2-6 Indications on the LCD Monitor and in
the Viewfinder .......................................................... 21
2-7 Lens (Optional)......................................................... 29
2-8 1.5-Inch Viewfinder (Optional).................................. 30
PREPARATIONS
3. BASIC SYSTEM CONNECTIONS AND
ADJUSTMENTS
3-1 Basic System ........................................................... 31
3-2 Attaching the Zoom Lens......................................... 32
3-3 Attaching the Viewfinder .......................................... 32
3-4 Attaching the Microphone (Provided)....................... 33
3-5 Attaching the Microphone (Optional)........................ 33
3-6 Attaching the Tripod Base (Provided) ...................... 34
4. POWER SUPPLY
4-1 AC Operation ........................................................... 35
4-2 Battery Pack Operation (Optional)........................... 35
BASIC OPERATIONS
5. PREPARATIONS
5-1 Turning the Power ON ............................................. 39
5-2 Cassette Loading and Unloading............................. 40
5-3 Viewing the LCD Monitor ......................................... 42
5-4 Setting, Displaying and Recording the Date
and Time .................................................................. 43
5-5 Charging the Built-in Battery.................................... 46
6. SETTING AND ADJUSTMENTS BEFORE
SHOOTING
6-1 Camera Settings ...................................................... 47
6-2 Screen Size (4:3/LETTER) Mode Selection............. 47
6-3 Viewfinder Adjustment.............................................. 48
6-4 External Monitor Adjustment .................................... 48
6-5 Back Focus Adjustment............................................ 49
6-6 White Balance Adjustment ....................................... 50
6-7 Audio Input Signal Selection.................................... 51
6-8 Recording Level Adjustment .................................... 52
6-9 Monitoring Audio during Recording .......................... 53
CONTENTS
E-5
CONTENTS
INTRODUCTION
MAIN FEATURES ............................................................... 4
1. INTRODUCTION
1-1 Precautions for Proper Use........................................ 6
1-2 Routine and Periodical Maintenance ......................... 7
1-3 Precautions for Use of Head Cleaning Tape .............. 7
1-4 Videocassette to be Used.......................................... 8
1-5 Battery Pack to be Used ............................................ 8
1-6 Condensation............................................................. 9
1-7 Characteristic CCD Phenomena................................ 9
2. CONTROLS, INDICATORS AND CONNECTORS
2-1 Front Section ............................................................ 10
2-2 Right Side Section.................................................... 12
2-3 Left Side Section...................................................... 17
2-4 Top Section .............................................................. 18
2-5 Rear Section ............................................................ 19
2-6 Indications on the LCD Monitor and in
the Viewfinder .......................................................... 21
2-7 ZOOM Lens (Optional)............................................. 29
2-8 1.5-Inch Viewfinder (Optional).................................. 30
PREPARATIONS
3. BASIC SYSTEM CONNECTIONS AND
ADJUSTMENTS
3-1 Basic System ........................................................... 31
3-2 Attaching the Zoom Lens......................................... 32
3-3 Attaching the Viewfinder .......................................... 32
3-4 Attaching the Microphone (Provided)....................... 33
3-5 Attaching the Microphone (Optional)........................ 33
3-6 Attaching the Tripod Base (Provided) ...................... 34
4. POWER SUPPLY
4-1 AC Operation ........................................................... 35
4-2 Battery Pack Operation (Optional)........................... 35
BASIC OPERATIONS
5. PREPARATIONS
5-1 Turning the Power ON ............................................. 39
5-2 Cassette Loading and Unloading............................. 40
5-3 Viewing the LCD Monitor ......................................... 42
5-4 Setting, Displaying and Recording the Date
and Time ..................................................................43
5-5 Charging the Built-in Battery.................................... 46
6. SETTING AND ADJUSTMENTS BEFORE
SHOOTING
6-1 Camera Settings ...................................................... 47
6-2
Screen Size (4:3/LETTER/SQUEEZE) Mode Selection.....
47
6-3 Viewfinder Adjustment ............................................. 48
6-4 External Monitor Adjustment .................................... 48
6-5 Back Focus Adjustment............................................ 49
6-6 White Balance Adjustment ....................................... 50
6-7 Audio Input Signal Selection.................................... 51
6-8 Recording Level Adjustment .................................... 52
6-9 Monitoring Audio during Recording.......................... 53
7. SHOOTING OPERATION
7-1 Basic Recording Operation...................................... 54
7-2 Searching for Recorded Scenes (Edit Search)........ 56
7-3 If the Record-Standby Mode Continues................... 57
7-4 Checking Recorded Contents in Record-Standby
Mode (Recording Check Function) .......................... 57
7-5 HEADER REC Function........................................... 58
7-6 Recording the Colour Bars....................................... 60
8. PLAYBACK MODE
8-1 Playback Procedure................................................. 61
8-2 Fast-Forward, Rewind.............................................. 62
8-3 Search...................................................................... 62
8-4 Blank Search............................................................ 62
8-5 Variable Slow Playback............................................ 63
8-6 Outputting CH-3, CH-4 Channel Audio .................... 64
APPLICATION
9. USING EXTERNAL COMPONENTS
9-1 Connecting a Video Component with
DV Connector .......................................................... 65
10. TIME CODE OPERATION
10-1 Displaying Time Code.............................................. 67
10-2 Presetting and Recording of Time Code .................. 68
10-3 Recording Time Codes in Continuation of Time
Codes Recorded on Tape ........................................ 70
10-4 Reproducing Time Codes......................................... 70
11. MENU SCREENS
11-1 Menu Screen Configuration ..................................... 71
11-2 Setting Menu Screens.............................................. 72
11-3 FILE MANAGE Menu Screen................................... 73
11-4 TOP MENU Screen.................................................. 74
11-5 CAMERA OPERATION Menu Screen...................... 75
11-6 CAMERA PROCESS MENU Screen ....................... 76
11-7 ADVANCED PROCESS Screen .............................. 78
11-8 SKIN COLOR ADJUST Screen............................... 79
11-9 AUDIO Menu Screen ............................................... 79
11-10
LCD/VF Menu Screen.............................................. 81
11-11
TC/UB/CLOCK Menu Screen................................... 83
11-12
HEADER REC Menu Screen ................................... 84
11-13
TIME/DATE Menu Screen........................................ 85
11-14
OTHERS Menu Screen............................................ 86
12. FEATURES OF THE CAMERA SECTION
12-1 Full-Time Auto White Balance (FAW)....................... 88
12-2 IRIS (Brightness) Adjustment ................................... 89
12-3 Adjusting the Shutter Speed .................................... 90
12-4 Shooting the Screen Image on a Computer
Monitor ..................................................................... 91
12-5 Gain (Sensitivity) Adjustment ...................................92
12-6 Switch Setup According to Illumination
and Subject .............................................................. 93
12-7 How to Use Skin Detail ............................................ 94
OTHERS
13. OTHERS
13-1 Alarm Indications and Actions .................................. 96
13-2 Troubleshooting ....................................................... 99
13-3 Hour Meter Display ................................................ 100
13-4 Specifications ......................................................... 101
E
U