


98
13. OTHERS
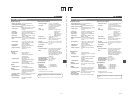
■Viewfinder Warning Lamps
REC
BATT
ALARM
1. 2.
Battery lamp REC/ALARM lamp
1.
BATTERY lamp
This red lamp lights red under the following circumstances.
Lights red : When the battery voltage becomes too low for
the camera to operate.
2.
REC/ALARM lamp
This lamp lights or blinks green under the following
conditions.
Lights Green : ●While recording
Blinks Green : ●During the interval where the unit
switches from record-standby to record
mode.
●Immediately before the tape runs out or
has run out.
●If the VCR malfunctions.
Whether or not alarm sound should be output and the
volume level are selected with the ALARM VR LEVEL item
on the OTHERS (2/2) menu screen.
■Alarm Sound
When remaining battery power becomes low, a warning
sound is output from the monitoring loudspeaker and the
PHONES jack. (In Camera mode only)
When an irregularity occurs in the VCR, a warning sound is
also output.
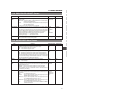
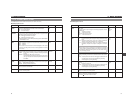
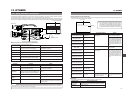
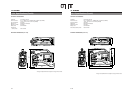
■Depending on the alarm conditions, the warning indicators on the LCD monitor/viewfinder screen, the TALLY lamp, the viewfinder
lamp, and alarm sounds appear as shown in the following table.
Alarm Indications
on LCD Monitor/
Viewfinder Screen
TALLY
Lamp
Lamp Viewfinder Lamp
Alarm Sound Condition
Alarm BATT
VTR alarm indication
(Example)
TAPE NEAR END
LOW VOLTAGE
Display symbols :Steady lighting :Blinking once per second. :Blinking four times per second.
:
Sound interrupted once per second.
:Continuous sound.
Dew formation (condensation) or error
has occurred in the VCR.
About 3 min. before tape end
(displayed during recording).
Tape end
(displayed during recording).
Remaining battery power is low.
0701
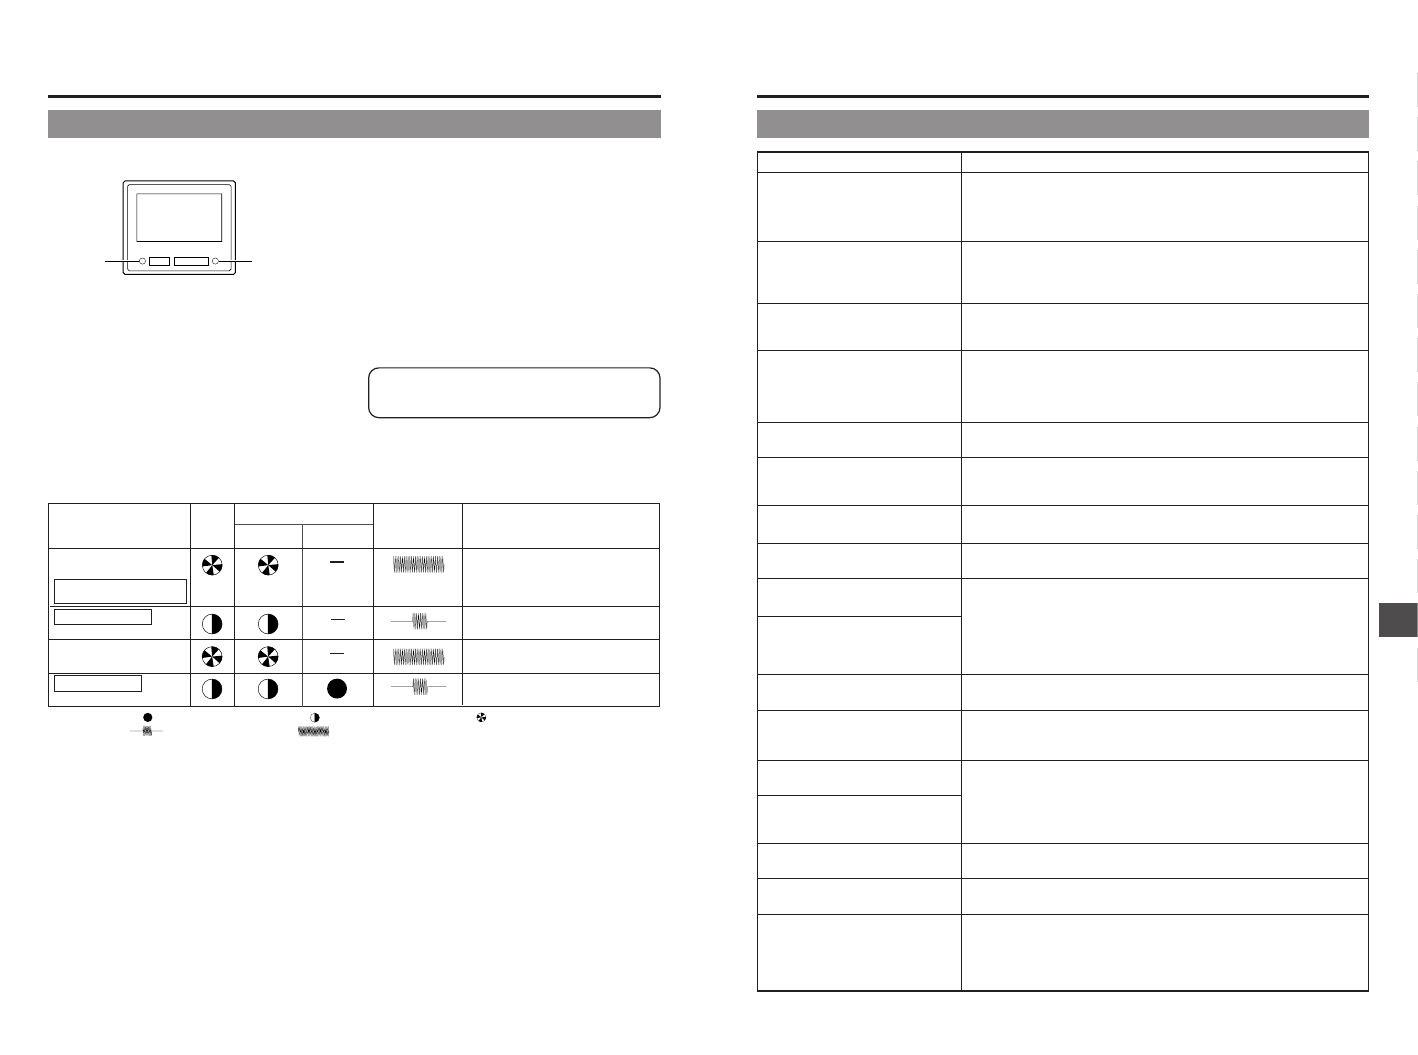
DRUM MOTOR FAILURE
13-1 Alarm Indications and Actions (Cont’d)
99
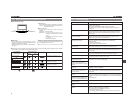
13. OTHERS
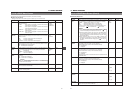
Symptoms Remedy
Power cannot be switched ON.
Recording is not possible.
Camera image does not appear on LCD
monitor or in viewfinder.
Image shown on LCD monitor or in
viewfinder is dark or blurred.
Playback does not start when the play
button is pressed.
DV signal cannot be input.
Noise interferes with playback video.
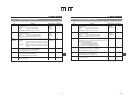
Sound is not output during playback.
Noise appears when playing back a tape
recorded on another unit.
The transient section between scenes
recorded on other units and those
recorded on the GY-DV5100 may appear
disturbed.
The front section’s audio level control
doesn’t work.
The front section’s audio level control
doesn’t change the audio level of the
sound input to CH-2.
Remaining battery power display is
incorrect.
Battery alarm is displayed and the GY-
DV5100 enters the non-operating mode
even when a fully charged battery is used.
Cassette cannot be ejected after the
power is turned ON.
Time code or user’s bits data not
displayed.
The date and time are not displayed or
recorded.
13-2 Troubleshooting
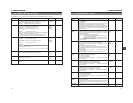
● Is power supply connected correctly?
● Is battery pack recharged?
● Was the power turned ON immediately after being turned OFF?
Wait at least 5 seconds before turning the power ON again once it has been
turned OFF.
● Is the switch on cassette set to “REC”? If it is set to “SAVE”, set it to “REC”.
● The Camera mode has not been selected. (The CAM indicator does not light.)
While the VTR indicator lights, press the MODE switch upward to turn on the
CAM indicator.
● The Camera mode has not been selected. (The CAM indicator does not light.)
While the VTR indicator lights, camera image will not be output. Press the
MODE switch upward to turn on the CAM indicator.
● Adjust the brightness of the LCD monitor or viewfinder screen.
● Is the color temperature conversion filter knob set to 5600K+ND?
● Is the iris closed?
● Is the shutter speed too fast?
● Is the viewfinder cable correctly connected?
● In the Camera mode, is “STOP” indicated as the VTR operation mode indicator?
When “STBY” is indicated, press the STOP button to display “STOP”.
● The VTR mode has not been selected. (The VTR indicator does not light.)
While the CAM indicator lights, press the MODE switch upward to turn on the
VTR indicator.
● Video head may be clogged with dirt. Clean head with the special head cleaning
tape. (☞ See “Precautions for Use of Head Cleaning Tape” on page 7.)
● Is the AUDIO SELECT item on the AUDIO/VIDEO menu screen set to CH3/4.
To output the sound of the recording, set to CH1/2.
● When a tape recorded on another unit is played back or used for recording, this
phenomenon may occur due to tracking errors.
● Is the CH1 FRONT VR item on the AUDIO/VIDEO menu screen set to
“DISABLE”? If so, set to “ENABLE”.
● The front section’s audio level control cannot be used to change the audio level
of the sound input to CH-2. Use the side section’s CH-2 audio level control for
this purpose.
● The OTHERS (2/2) menu screen’s BATTERY TYPE item may not be set
correctly in accordance with the type of battery in use. If the menu item setting is
incorrect, set it correctly using the OTHERS (2/2) menu screen’s item BATTERY
TYPE.
● Is the battery old?
● The capacity of the power supply may be insufficient. Check the power voltage.
● Is the TC/UB item on the LCD/VF menu screen set to OFF? If so, set to ON.
● Is the DISPLAY item on the TIME/DATE menu screen set to OFF? Set to ON
when the data should be displayed and recorded.
To record the data, set the DATE REC item as well.
● Is the date and time setting made?
☞ See “Setting, Displaying and Recording the Date and Time” on page 43-45.