


83
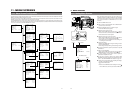
11. MENU SCREENS
TC PRESET
UB PRESET
DROP/
NON DROP
HEADER REC
TIME/DATE
PAGE BACK
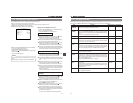
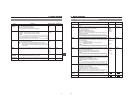
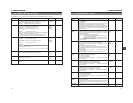
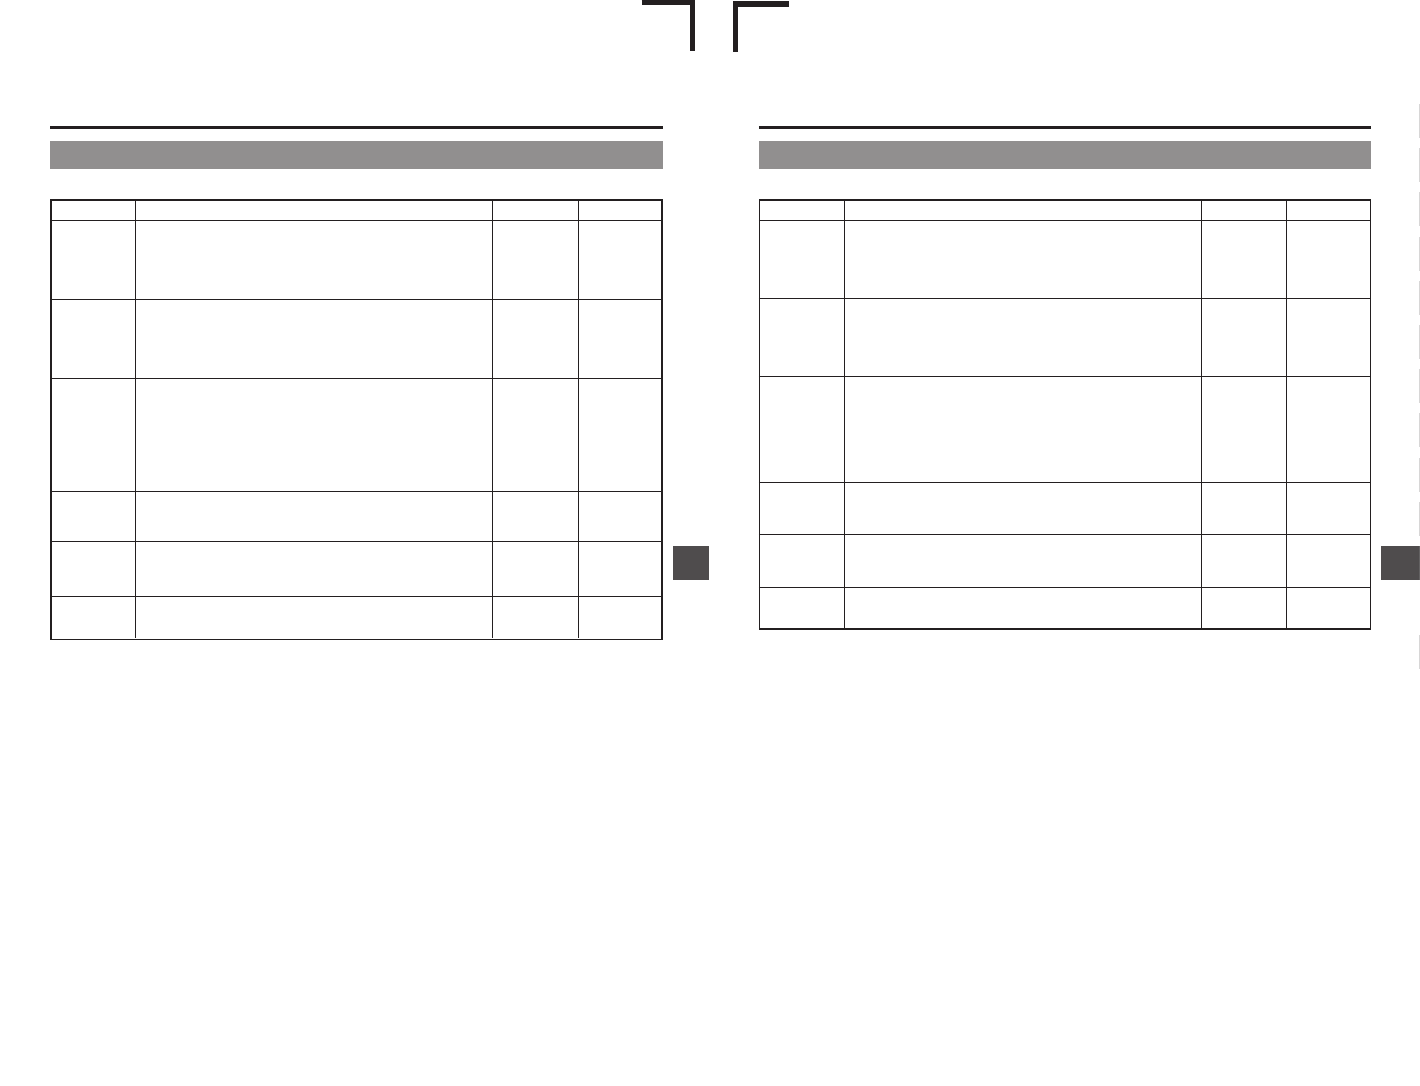
11-11 TC/UB/CLOCK Menu Screen
Time codes and user’s bits can be set on this screen. Date and time is set on the screen that can be reached from this screen.
Item Function Variation Range Initial Setting
EXECUTE
CANCEL
ZERO
PRESET
EXECUTE
CANCEL
ZERO
PRESET
DROP
NON DROP
–––––
–––––
–––––
EXECUTE
EXECUTE
DROP
–––––
–––––
–––––
To preset the time code, align the cursor with this position and then press
the SHUTTER dial.
EXECUTE : The set time code is confirmed.
CANCEL : The set time code is cancelled.
ZERO PRESET: Resets all time codes to zero (0).
To preset the user’s bit data, align the cursor with this position and then
press the SHUTTER dial.
EXECUTE : The set user’s bit data are confirmed.
CANCEL : The set user’s bit data are cancelled.
ZERO PRESET: Resets all user’s bits data to zero (0).
To select the time code generator’s framing mode as either drop or non-
drop mode.
DROP : The internal time code generator runs in drop mode.
Choose this setting when emphasizing the recorded
time.
NON DROP : The internal time code generator runs in non drop mode.
Choose this setting when emphasizing the frame
number.
To make settings related to the HEADER REC function, align the cursor
with this position, and then press the SHUTTER dial.
☞ See “HEADER REC Menu Screen” on page 84.
To make settings related to the date and time, align the cursor with this
position and then press the SHUTTER dial.
☞ See “TIME/DATE Menu Screen” on page 85.
The TOP MENU returns when the SHUTTER dial is pressed while the
cursor is at this position.
E-83
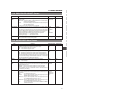
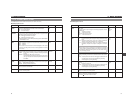
11. MENU SCREENS
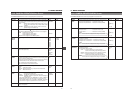
11-11 TC/UB/CLOCK Menu Screen
Time codes and user’s bits can be set on this screen. Date and time is set on the screen that can be reached from this screen.
Item Function Variation Range Initial Setting
TC PRESET
UB PRESET
UB REC
HEADER REC
TIME/DATE
PAGE BACK
EXECUTE
CANCEL
ZERO PRESET
EXECUTE
CANCEL
ZERO PRESET
ON
OFF
–––––
–––––
–––––
EXECUTE
EXECUTE
ON
–––––
–––––
–––––
To preset the time code, align the cursor with this position and then press
the SHUTTER dial.
EXECUTE : The set time code is confirmed.
CANCEL : The set time code is cancelled.
ZERO PRESET: Resets all time codes to zero (0).
To preset the user’s bit data, align the cursor with this position and then
press the SHUTTER dial.
EXECUTE : The set user’s bit data are confirmed.
CANCEL : The set user’s bit data are cancelled.
ZERO PRESET: Resets all user’s bits data to zero (0).
To select whether or not user’s bit data should be recorded.
To select whether the user’s bits should be displayed during playback of a
tape with recorded user’s bits data.
ON : User’s bits are recorded during recording.
User’s bits are displayed during playback.
OFF: User’s bits are not recorded during recording.
User’s bits are not displayed during playback.
To make settings related to the HEADER REC function, align the cursor
with this position, and then press the SHUTTER dial.
☞ See “HEADER REC Menu Screen” on page 84.
To make settings related to the date and time, align the cursor with this
position and then press the SHUTTER dial.
☞ See “TIME/DATE Menu Screen” on page 85.
The TOP MENU returns when the SHUTTER dial is pressed while the
cursor is at this position.
E
U