


69
10. TIME CODE OPERATION
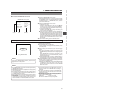
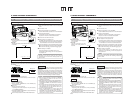
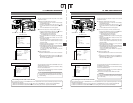
––– MENU –––
CAMERA OPERATION..
CAMERA PROCESS..
AUDIO/VIDEO..
LCD/VF..
TC/UB/CLOCK..
OTHERS..
FILE MANAGE..
MENU ALL RESET CANCEL
EXIT
––– TC/UB/CLOCK –––
TC PRESET 00:00:00:00
EXECUTE
UB PRESET 00 00 00 00
EXECUTE
DROP/NON DROP DROP
TIME/DATE..
PAGE BACK
HEADER REC..
––– TC/UB/CLOCK –––
TC PRESET 00:00:00:00
EXECUTE
UB PRESET 00 00 00 00
EXECUTE
DROP/NON DROP DROP
TIME/DATE..
PAGE BACK
HEADER REC..
Align the cursor with UB
TIME CODE PRESETTING PROCEDURE
The time code and user’s bit data are preset on the TC/UB/
CLOCK menu screen.
1.
Display the TC/UB/CLOCK menu screen.
1Press the Status button for 1 second or more to display
the TOP MENU screen.
2Rotate the SHUTTER dial to align the cursor (
) with
the TC/UB/CLOCK item, and then press the SHUTTER
dial.
● The TC/UB/CLOCK menu screen appears.
2.
Set the time code (hours, minutes, seconds, frames).
1Rotate the SHUTTER dial to align the cursor ( ) with TC
PRESET, and then press the SHUTTER dial.
● The first digit of the time code blinks.
The blinking digit is the one to be set.
2When the SHUTTER dial is pressed, the blinking digit
changes.
3When the SHUTTER dial is rotated, the value of the
blinking digit changes.
When the SHUTTER dial is rotated upward, the value
becomes higher. When rotated downward, the value
becomes smaller.
4Repeat the procedure described in 2 and 3 above to
set the desired value for all digits.
5After setting the frame digit, press the SHUTTER dial to
make EXECUTE blink. The setting values are confirmed
when the SHUTTER dial is pressed again.
To cancel the setting, select CANCEL and press the
SHUTTER dial.
3.
When all the digits are set.
● Press the STATUS button to return to the normal screen
or
● Rotate the SHUTTER dial to align the cursor (
) with the
PAGE BACK item, and then press the SHUTTER dial to
return to the TOP MENU screen.
TOP MENU screen
TC/UB/CLOCK menu screen
Time code (hour, min, sec, frame)
PRESETTING USER’S BIT DATA
The user’s bit data are preset with the UB PRESET item on the
TC/UB/CLOCK menu screen.
The method for setting is the same as the method for setting
the time code described above.
● The user’s bit can be specified using numerals or alphabetic
letters from 0 to F for each digit.
CAUTION:
It is not possible to set all the digits of the user’s bit data to
“F”. Reading of the data during playback will not be possible
for an all-F setting.
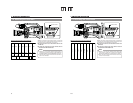
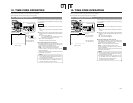
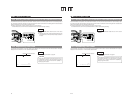
MONITOR
EDITSEARCH
FILTER
STATUS
SHUTTER
MENU
AUTO IRIS
BACK L
NORMAL
SPOT L
STRETCH
NORMAL
COMPRESS
FULL AUTO BLACK LOLUX
MODE
POWER
ON OFF
VTR
OPEN
VTR
CAM
1
3200K
5600K
5600K
5600K
ND
/
/
ND
2
.3
.4
1
8
1
64
CH-1
AUDIO IN
AUDIO SELECT
CH-2
CH-1 CH-2
FRONT
REAR
AUTO
MANUAL
AUDIO
LEVEL
CH-1 CH-2
PULL
OPEN
LCDBRIGHT DISPLAY
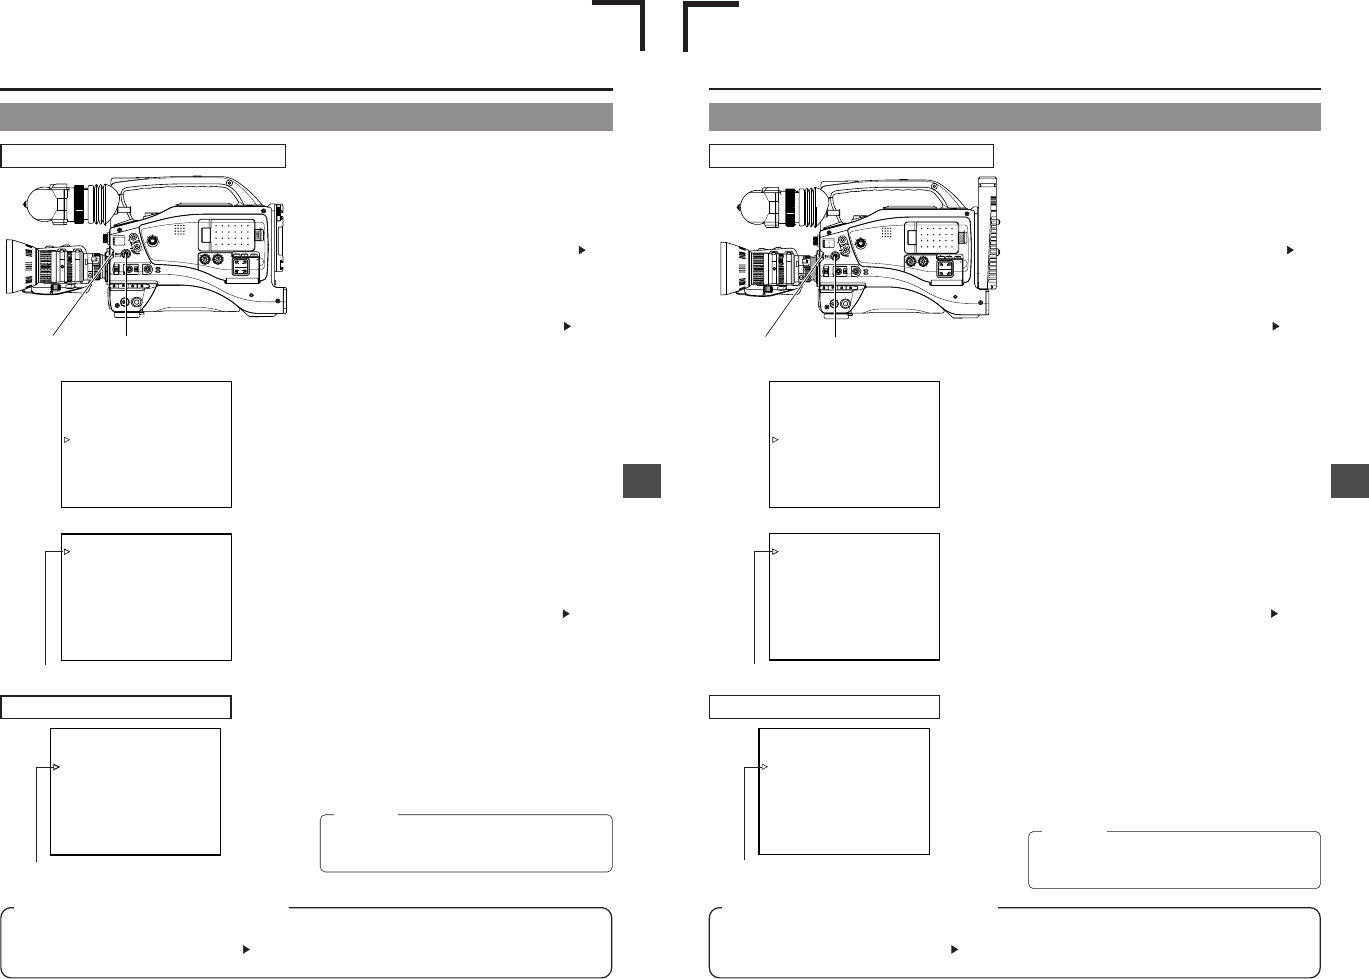
SHUTTER dial STATUS button
Zero-resetting the Time Code or User’s Bit Data
This is performed with the TC or UB PRESET item on the TC/UB/CLOCK menu screen. (Performed separately for the time
code and the user’s bit data.)
1Rotate the SHUTTER dial to align the cursor (
) with the TC or UB PRESET item, and then press the SHUTTER dial.
2Rotate the SHUTTER dial to select ZERO PRESET as the setting value, and then press the SHUTTER dial.
10. TIME CODE OPERATION
E-69
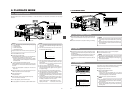
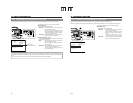
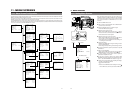
––– MENU –––
CAMERA OPERATION..
CAMERA PROCESS..
AUDIO..
LCD/VF..
TC/UB/CLOCK..
OTHERS..
FILE MANAGE..
MENU ALL RESET CANCEL
EXIT
––– TC/UB/CLOCK –––
TC PRESET 00:00:00:00
EXECUTE
UB PRESET 00 00 00 00
EXECUTE
UB REC ON
HEADER REC..
TIME/DATE..
PAGE BACK
––– TC/UB/CLOCK –––
TC PRESET 00:00:00:00
EXECUTE
UB PRESET 00 00 00 00
EXECUTE
UB REC ON
TIME/DATE..
PAGE BACK
HEADER REC..
Align the cursor with UB
TIME CODE PRESETTING PROCEDURE
The time code and user’s bit data are preset on the TC/UB/
CLOCK menu screen.
1.
Display the TC/UB/CLOCK menu screen.
1Press the Status button for 1 second or more to display
the TOP MENU screen.
2Rotate the SHUTTER dial to align the cursor (
) with
the TC/UB/CLOCK item, and then press the SHUTTER
dial.
● The TC/UB/CLOCK menu screen appears.
2.
Set the time code (hours, minutes, seconds, frames).
1Rotate the SHUTTER dial to align the cursor (
) with TC
PRESET, and then press the SHUTTER dial.
● The first digit of the time code blinks.
The blinking digit is the one to be set.
2When the SHUTTER dial is pressed, the blinking digit
changes.
3When the SHUTTER dial is rotated, the value of the
blinking digit changes.
When the SHUTTER dial is rotated upward, the value
becomes higher. When rotated downward, the value
becomes smaller.
4Repeat the procedure described in 2and 3above to
set the desired value for all digits.
5After setting the frame digit, press the SHUTTER dial to
make EXECUTE blink. The setting values are confirmed
when the SHUTTER dial is pressed again.
To cancel the setting, select CANCEL and press the
SHUTTER dial.
3.
When all the digits are set.
● Press the STATUS button to return to the normal screen
or
● Rotate the SHUTTER dial to align the cursor (
) with the
PAGE BACK item, and then press the SHUTTER dial to
return to the TOP MENU screen.
TOP MENU screen
TC/UB/CLOCK menu screen
Time code (hour, min, sec, frame)
PRESETTING USER’S BIT DATA
The user’s bit data are preset with the UB PRESET item on the
TC/UB/CLOCK menu screen.
The method for setting is the same as the method for setting
the time code described above.
● The user’s bit can be specified using numerals or alphabetic
letters from 0 to F for each digit.
● To record user’s bit data, set the UB REC item to ON.
CAUTION:
It is not possible to set all the digits of the user’s bit data to
“F”. Reading of the data during playback will not be possible
for an all-F setting.
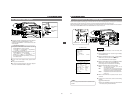
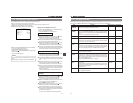
MONITOR
EDITSEARCH
FILTER
STATUS
SHUTTER
MENU
AUTO IRIS
BACK L
NORMAL
SPOT L
STRETCH
NORMAL
COMPRESS
FULL AUTO BLACK LOLUX
MODE
POWER
ON OFF
VTR
OPEN
VTR
CAM
1
3200K
5600K
5600K
5600K
ND
/
/
ND
2
.3
.4
1
8
1
64
CH-1
AUDIO IN
AUDIO SELECT
CH-2
CH-1 CH-2
FRONT
REAR
AUTO
MANUAL
AUDIO
LEVEL
CH-1 CH-2
PULL
OPEN
LCDBRIGHT DISPLAY
SHUTTER dial STATUS button
Zero-resetting the Time Code or User’s Bit Data
This is performed with the TC or UB PRESET item on the TC/UB/CLOCK menu screen. (Performed separately for the time
code and the user’s bit data.)
1Rotate the SHUTTER dial to align the cursor (
) with the TC or UB PRESET item, and then press the SHUTTER dial.
2Rotate the SHUTTER dial to select ZERO PRESET as the setting value, and then press the SHUTTER dial.
E
U