


7
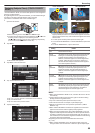
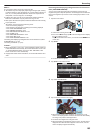
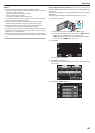
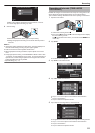
Tap “RECORD” and record the face from the front.
.
STOP
RECORD
RECORD THE FRONT VIEW
0
A face is captured to be used on the face registration index screen.
0
Other than tapping “RECORD”, you can also record by pressing the
SNAPSHOT button fully.
0
A sound can be heard when recording is complete.
0
To cancel the registration, tap “STOP”.
When “CANCEL FACE RECOGNITION?” appears, tap “YES” to
return to the normal recording mode.
8
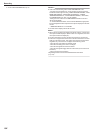
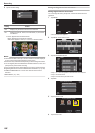
Tap “YES” to continue recording.
.
NOYES
CONTINUE RECORDING?
FACE RECOGNITION ACCURACY,
MORE FACE DATA WILL IMPROVE
CURRENT RECORDING IS OK,
0
To proceed to collect face information in the four directions of up,
down, left, and right, tap “YES”. It is recommended to continue
recording to increase the accuracy of face recognition.
0
To end face registration recording, tap “NO”. Go to step 11.
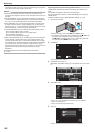
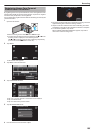
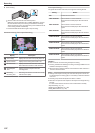
9
Rotate
the face slowly in four directions to register the face information.
.
STOP
ROTATE THE FACE SLOWLY
0
Rotate the face slowly while looking at the camera. A sound can be
heard when recording is complete for each direction. (4 times in total)
Repeat the step until recording (registration) is complete for all
directions.
0
Registration of the four directions may fail depending on the shooting
environment. In this case, tap “STOP” to cancel recording, then tap
“NO” and go to step 11.
0
If the face cannot be properly recognized during recording, register
the face again.
10
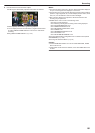
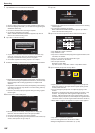
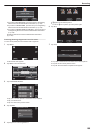
Face the camera with a smiling face.
.
STOP
SMILE
RECORD FRONT OF SMILING FACE
0
Recording starts automatically. Using the smile % display as a
reference, smile such that the value is as high as possible.
0
A sound can be heard when recording is complete.
0
To
cancel recording of smiling face and proceed to enter a name, tap
“STOP”, then tap “NO” and go to step 11.
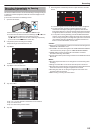
11
Tap “OK”.
.
STOP
OK
ENTER A NAME
RECORDING COMPLETED
0
Tapping
“OK” registers the recorded face and the screen for entering
a name appears.
0
To cancel the registration, tap “STOP”.
When “CANCEL FACE RECOGNITION?” appears, tap “YES” to
return to the normal recording mode.
12
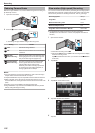
Tap on the on-screen keyboard to enter a name, then tap “REG.”.
.
CANCELREG.
DELETE
0
Tap “DELETE” to delete a character.
0
Tap “CANCEL” to exit.
0
Tap
“A/a/1” to select character input type from upper case letter, lower
case letter, and number.
0
Tap E or F to move one space to the left or right.
0
Up to 8 characters can be entered.
0
How to input characters
Example: To enter “KEN”
Tap “JKL” 2 times F Tap “DEF” 2 times F Tap “MNO” 2 times
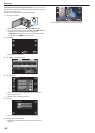
13
Tap the desired priority level, then tap “REG.”.
.
KEN
STOPREG.
TOUCH ORDER TO RECOGNIZE
0
Upon registration, the last number is assigned as the priority level.
During face detection, the subject with the highest priority (lowest
number) will be detected.
0
You can change the priority level of a subject by tapping on the
number.
Example: To change the priority level of number 3 to number 1, tap
number 1. The priority level of the registered subject becomes
number 1, while the priority levels of the original number 1 and the
ones below drop by one place. (In this example, the original number
1
becomes number 2, and the orignal number 2 becomes number 3.)
0
When “REG.” is tapped, the registration complete screen appears.
.
OK
REGISTERED
0
Tap “OK” to complete the registration.
0
You can edit registered face information in “EDIT”.
“Editing the Registered Face Information” (A p. 108
)
Recording
106