


Necessary Settings
To send e-mails, the following settings are required.
*The
above settings are not necessary if they have already been set for other
functions.
0
Registering an access point
“Registering the Access Points to Connect (“ACCESS POINTS”)”
(A p. 36)
0
Setting the account for sending e-mails
“Setting the Sender’s E-mail Address” (A p. 31)
0
Registering the recipient’s e-mail address
“Registering the Recipient’s E-mail Address” (A p. 34)
o
Selecting the Recipient’s E-mail Address
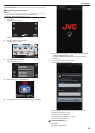
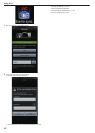
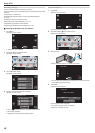
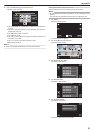
1
Tap “MENU”.
(Operation on this camera)
.
REC
PLAY
MENU
0
The shortcut menu appears.
2
Tap “Wi-Fi” (Q) in the shortcut menu.
(Operation on this camera)
.
MENU
3
Tap “VIDEO MAIL ATTN.”.
(Operation on this camera)
.
VIDEO MAIL ATTN.
Wi-Fi
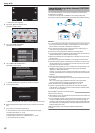
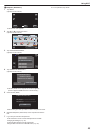
4
Tap the e-mail address to be set as recipient.
(Operation on this camera)
.
SET
VIDEO MAIL ATTN.
0
An icon a appears beside the recipient’s e-mail address.
0
After setting, tap “SET”.
0
Settings will not be saved until “SET” is tapped.
Operation Method
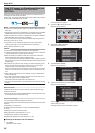
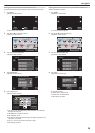
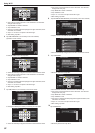
1
Tap “MENU”.
(Operation on this camera)
.
REC
PLAY
MENU
0
The shortcut menu appears.
2
Tap “VIDEO MAIL” (R) in the shortcut menu.
(Operation on this camera)
.
MENU
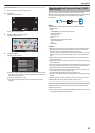
3
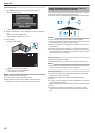
Start recording.
.
0
Recording starts after the countdown (5 seconds).
.
REC
0:00:15
VIDEO MAIL
0
You
can allow the recording to be performed for 15 seconds or press
the START/STOP button to stop.
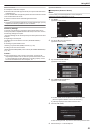
4
Tap “SEND”.
(Operation on this camera)
.
PLAY TO CHECK
STOP
SEND
SEND THIS VIDEO?
VIDEO MAIL
0
Sending of the video mail starts.
0
To check the file, tap “PLAY TO CHECK”.
0
When it is complete, tap “OK”.
Using Wi-Fi
26