


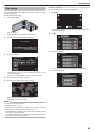


Using the Touch Screen
Icon operation buttons, thumbnails, and menu items are displayed on the
touch screen according to the mode in use.
0
There
are two ways to operate the touch screen, namely “tap” and “drag”.
The following are some examples.
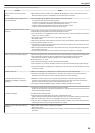
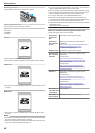
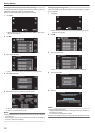
A Tap the displayed button (icon) or thumbnail (file) on the touch screen
to make selection.
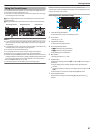
B Drag the thumbnails on the touch screen to search for the desired file.
.
REC
0:01:23 0:12:340:01:23 0:12:34
MENU
REC
MENU
PLAY
REC
Index ScreenPlayback ScreenRecording Screen
Memo :
0
The
touch screen of this unit is pressure-sensitive. When the touch screen
does not respond smoothly, apply slightly more force to your fingertip or
the stylus pen.
0
Tap the buttons (icons) on the touch screen accurately. The buttons may
not respond if they are not tapped on the right area.
0
Do not press or rub with excessive force.
0
Do not operate the touch screen using an object with a sharp tip.
0
Pressing two or more places at a time may cause a malfunction.
0
Perform “TOUCH SCREEN ADJUST” if the reactive area of the screen is
misaligned with the touched area. (Adjust by lightly tapping with the stylus
pen. Do not press with an object with a sharp tip or do not press hard.)
“ TOUCH SCREEN ADJUST ” (A p. 202)
0
It is recommended to use the stylus pen for handwriting effect.
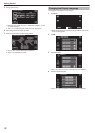
Names of Buttons and Functions on the LCD Monitor
The following screens are displayed during the video and still image modes,
and operate as the touch screens.
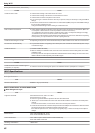
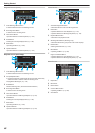
Recording Screen (Video/Still Image)
.
MENU
REC
PLAY
1
Video/Still Image Mode Button
0
Switches between video and still image modes.
2
Zoom Button
“Zooming” (A p. 79
)
3
Playback Mode Button
0
Switches to the playback mode.
4
Recording Start/Stop Button
0
6: Video Recording Start Button
0
7: Video Recording Stop Button
0
Q: Still Image Recording Button
5
Menu Button
“Operating the Menu” (A p. 169)
6
Display Button
Switches the display between full (m) and simple (n) with every tap of
the button.
0
Simple display: Some displays disappear after approximately 3
seconds.
0
Full display: Displays everything. The display button changes from n
to m.
0
When the power is turned off, simple display (n) will be set.
7
Recording Mode Button
Switches the recording mode between P Intelligent Auto and H
Manual.
Getting Started
67