


Registering the Recipient’s E-mail Address
Registers the e-mail addresses of recipients on the camera.
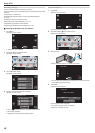
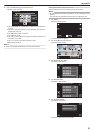
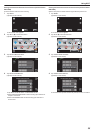
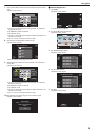
1
Tap “MENU”.
(Operation on this camera)
.
REC
PLAY
MENU
0
The shortcut menu appears.
2
Tap “Wi-Fi” (Q) in the shortcut menu.
(Operation on this camera)
.
MENU
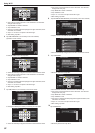
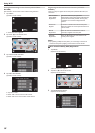
3
Tap “NETWORK SETTINGS”.
(Operation on this camera)
.
Wi-Fi
NETWORK SETTINGS
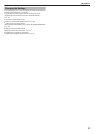
4
Tap “MAIL SETTING”.
(Operation on this camera)
.
MAIL SETTING
NETWORK SETTINGS
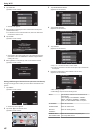
5
Tap “RECIPIENT'S EMAIL”.
(Operation on this camera)
.
SENDER'S EMAIL
RECIPIENT'S EMAIL
MAIL SETTING
6
Tap “ADD”.
(Operation on this camera)
.
ADD
RECIPIENT'S EMAIL
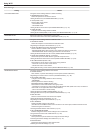
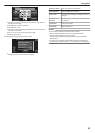
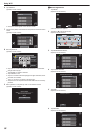
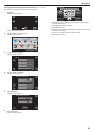
7
Enter the recipient’s e-mail address.
.
CANCELSET
DELETE
RECIPIENT'S EMAIL
0
Tap on the on-screen keyboard to enter characters. The character
changes with every tap.
0
Tap “DELETE” to delete a character.
0
Tap “CANCEL” to exit.
0
Tap
“A/a/1” to select character input type from upper case letter, lower
case letter, and number.
0
Tap E or F to move one space to the left or right.
0
After setting, tap “SET”.
Memo :
0
Up to 8 e-mail addresses can be registered as recipients.
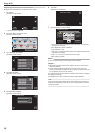
Caution :
0
When setting another person as the recipient, be sure to obtain his/her
consent in advance.
0
Check whether notifications indicating errors have been sent to the
sender’s
e-mail address. (Make use of a computer or similar devices as it
is not possible to check from the camera.)
If no notifications are received: Refer to “Unable to send e-mails.” and adjust
the settings accordingly.
If notifications are received: Check the content of the notification.
*Note
Do
not continue sending e-mails with the same settings if you receive error
notifications. Depending on the provider, you may be marked as a sender
of spam (junk mail).
Using Wi-Fi
34