


AXIS Q7411 Video Encoder
Access the Product
For Technical notes on this and other topics, visit the Axis Support web at www.axis.com/techsup
Set the Root Password
To access the Axis product, you must set the password for the default administrator user root. This is done in the Congure Root
Password dialog, which opens when the product is accessed for the rst time.
To prevent network eavesdropping, the root password can be set via an encrypted HTTPS connection, which requires an HTTPS
certicate. HTTPS (Hypertext Transfer Protocol over SSL) is a protocol used to encrypt trafc between web browsers and servers. The
HTTPS certicate ensures encrypted exchange of information. See HTTPS on page 48.
The default administrator user name root is permanent and cannot be deleted. If the password for root is lost, the product must be
reset to the factory default settings. See Reset to Factory Default Settings on page 60.
To set the password via a standard HTTP connection, enter it directly in the dialog.
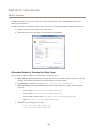
To set the password via an encrypted HTTPS connection, follow these steps:
1. Click Use HTTPS.
A temporary certicate (valid for one year) is created, enabling encryption of all trafc to and from the product, and the
password can now be set securely.
2. Enter a password and then re-enter it to conrm the spelling.
3. Click OK. The password has now been congured.
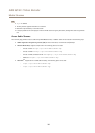
The Live View Page
The controls and layout of the Live View page may have been customized to meet specic installation requirements and user
preferences. Consequently, some of the examples and functions featured here may differ from those displayed in your own Live View
page. The following provides an overview of each available control.
Controls on the Live View Page
Click the View size buttons to show the image in full size (right button) or to scale down the image to
t the browser window (left button).
Select a stream prole for the Live View page from the Stream Prole drop-down list. For information
about how to congure stream proles, see page 19.
Click Pulse to activate the product’s output port for a dened period of time. For information about how
to enable and congure output buttons, see page 26. The output button name may differ depending on
the name entered in the I/O Ports conguration.
Click the Active/Inactive buttons to manually activate and inactive the product’s output port. For
information about how to enable and congure output buttons, see page 26.
The Manual Trigger button is used to trigger an action rule from the Live View page. For information
about how to congure and enable the button, see Manual Trigger on page 12.
11