


AXIS Q7411 Video Encoder
Video and Audio
• When setting up continuous recording. See Continuous Recording on page 45.
• In the Live View page – select the stream prole from the Stream prole drop-down list.
For quick setup, use one of the predened stream proles. Each predened prole has a descriptive name, indicating its purpose. If
required, the predened stream proles can be modied and new customized stream proles can be created.
To create a new prole or modify an existing prole, go to Setup > Video & Audio > Stream Proles.
To select a default stream prole for the Live View page, go to Setup > Live View Cong.
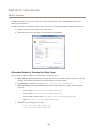
ONVIF Media Proles
An ONVIF media prole consists of a set of congurations that can be used to change media stream settings. ONVIF media proles
can be set through the ONVIF Media Prole Settings page and be used by a client to congure media stream properties.
The ONVIF Media Proles page lists all such pre-congured proles. These proles cannot be removed. Pre-congured media
proles have been included in the product for quick setup. It is also possible to congure new ONVIF media proles as per required
specications. To add a new ONVIF media prole, click Add and enter the required information. You can also modify or remove a
prole from this page.
Camera Settings
The Video & Audio > Camera Settings page provides access to advanced image settings for the Axis product.
Image Appearance
To change Image Appearance go to the menus under Setup > Video & Audio > Camera Settings.
Increasing the Color level increases the color saturation. The value 100 gives maximum color saturation and the value 0 gives
minimum color saturation.
The image Brightness can be adjusted in the range 0–100, where a higher value produces a brighter image.
The Contrast changes the relative difference between light and dark. It can be adjusted using the slidebar.
Video input
• The values in the Offset Adjustments elds affect the horizontal and vertical synchronization for the image. This can
be used to eliminate any black border surrounding the image. High values, both negative and positive can put the
image out of sync.
• De-interlacing - is used to improve video stream image quality from analog devices. Select any of the following options
from the De-interlacing drop-down list. Select None if de-interlacing is not necessary; Blending for improved image
quality that is not as processor intensive; Adaptive Interpolation performs de-interlacing of the video stream by applying
different lters on the image. This may give a better result than Motion Adaptive Interpolation in rare cases; Motion
Adaptive Interpolation performs de-interlacing of the video stream by applying different lters depending on the motion
in different parts of the image. This will in most cases result in the best image quality.
• Antialiasing will minimize distortion known as aliasing, which happens when a high-resolution image is represented at
a lower resolution.
75 Ohm video termination can be enabled/disabled via the product's web page at Video & Audio > Video Input > Video termination.
Video termination is enabled on factory default. If the product is connected in parallel with other equipment, for optimum video
quality, it is recommended that video termination is enabled only for the last device in the video signal chain.
Image Settings
Noise reduction - Set to On to enable noise reduction. Noise reduction may increase the amount of motion blur.
20