


Security Escort | Technical Reference Manual | 3.0 System Menus
and Screens
EN | 17
Bosch Security Systems | 6/12 | 38947D
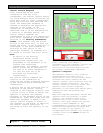
Transponder Area
Wandering Alarm - Create a protected
area by placing a virtual monitor fence
around an area of the main map. These
areas are defined in the transponder
database. If this transmitter is
constrained to remain within one of
these defined areas, first select the
defining transponder in the Transponder
Name field. Then select the desired
area from this dropdown list of the
transponder’s area names.
For the wandering alarm to work, the
supervision period must also be
programmed for this transmitter.
Specific transmitters are marked in the
Subscriber Database to be constrained
within a specific fenced area defined
by this option. If the transmitters
leave their defined area, the system
reports this as a wandering alarm and
continues to monitor and track the
location of the transmitter until the
alarm is canceled from the screen in
the normal way. However, these tracking
updates can only occur every
supervision transmission period (not on
an accelerated rate like a tracking
alarm).
The Security Escort System computes the
location of the transmitters when they
broadcast automatic supervision
transmissions periodically.
Because of the basic location accuracy
and the floor-to-floor accuracy of the
system, there is a potential for some
false alarms. If false alarms are a
problem, check the Filter Virtual Fence
checkbox in the Edit Security
Preferences Screen. If you do this, two
successive location calculations
indicate the transmitter moved outside
the protected area before an alarm was
generated. The downside of this is a
delay in the reporting of a wandering
alarm of one extra transmitter
supervision period.
Alarm Group
This is the alarm group that controls
the arm/disarm status of this
transmitter. Select the desired alarm
group from the dropdown list. This
alarm group must be armed for this
transmitter to cause an alarm, which is
displayed. If no alarm group is
assigned, the transmitter is always
armed.
Requires Check-in
When this checkbox is checked, this
transmitter activates once each day
during the check-in schedule time. At
the end of the check-in period, if the
subscriber fails to check-in, a Failed
to Check-in Report is generated and
presented to the operator. This report
contains all of the people who failed
to check-in with their first address
line and phone number. All subscribers
in the report must be checked on to
make sure they are not in need of
assistance, as this may be a life-
threatening situation. A printed report
may be generated.
If the transmitter is not a point type,
the transmitter can generate alarms and
therefore a test transmission is used
for the check-in.
If the transmitter is a point type, any
non-trouble transmission serves as a
check-in.
One of the ten schedules must be
selected as the check-in schedule to
define the check-in period.
Done
Click this button when all changes are
complete to return the main Subscriber
Database Edit Screen.
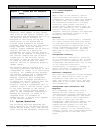
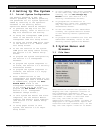
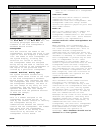
3.1.6 Transponder Database
The Transponder Database is established
at system set-up and contains all
necessary configuration data for each
transponder, receiver, and alert unit.
It describes the basic structure of the
installation, including all device
names, locations, types, multiplex
addresses, and so on. This information
is used by the central console to
generate alarm and test displays on the
central console and in determining
which alert units are activated.
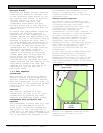
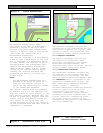
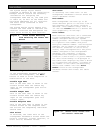
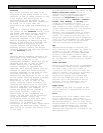
Figure 8: Find Transponder’s