


5. Click Continue.
6. Fill in the registration details for each new server:
a. Server name (for example, sametime)
b. Verify that the server administrator is correct.
Tip: You can select the LocalDomainAdmins group for the Server Administrator name field.
This allows everyone who is in the LocalDomainAdmins group to administer the server. Once
you have created new users, you can add the appropriate names to this group to grant them
administrator rights to the server. This saves you from having to edit every server document
in order to add administrators. (Click the person icon next to the Administrator name field,
switch to the "mycompany's Directory" address book and select LocalDomainAdmins.)
c. Uncheck the option to store the server ID in Domino Directory
Note: Each Domino Server has a unique name that is maintained in its own ID file. If you are
creating the first server in a new domain, Domino creates the server ID automatically during
the server configuration program. If you are creating an additional server in an existing
domain, then a unique ID file is created for the new server as part of the configuration
process.
d. Check the option to save the server ID to a file and make note of the name and location. (for
example, c:\Lotus\Domino\data\sametime.id) You need this file when installing the other
Domino servers.
e. Click the green checkmark to add the server to the Registration queue.
f. Repeat these steps for each of the other server(s) to be registered, if there is additional
server planned (see Table 15
on page 24).
7. Once you have created entries for all of the servers, select Register All. The ID files are saved to
the location you specified. These files need to be copied to their respective servers.
8. Click Done to close the Registration tool.
Create the Replication Topology
Setting up replication of databases between the master Domino server (directory) and the other
Domino servers (for example, sametime) involves defining a server group and creating a connection
document.
In the Domino Administrator client:
1. Go to the People and Groups tab and select Groups in the navigation tree (on the left).
2. Click Add Group.
3. Fill in the following fields:
● Group name: name (for example, MyCompanyServers - no blanks in name)
● Group type: select Servers only
● Members: enter or select the servers added in the previous section (for example,
sametime/mycompany)
4. Click Save & Close.
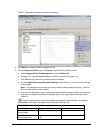
5. Go to the Configuration tab and select Server -> Connections in the navigation tree (on the
left).
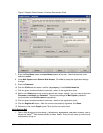
6. Click Add Connection.
25 Collaborative Portal: Implementation Guide