


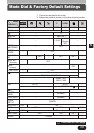
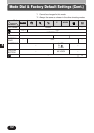


159
6
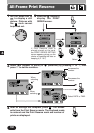
Trimming setting
It is possible to enlarge a part of a recorded picture and to print out the enlarged
section only.
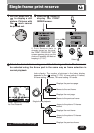
1
Do steps 1 – 4 of
“Single-frame print
reserve”. In step 4,
select (P. 158).
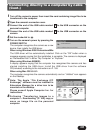
If has been set already, the screen
appears. Select RESET.
●If other items are selected, the screen returns to
the screen, which is displayed in step 4 on P.
158.
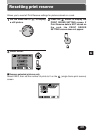
To save the current trimming size T OK
To set a new trimming size T RESET
To cancel the trimming size T CANCEL
If is not set on the desired
picture, a screen appears giving
you the choice of setting trimming
(SETUP) or canceling trimming
(CANCEL).
CANCEL
RESET
O K
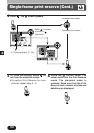
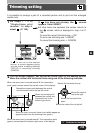
2
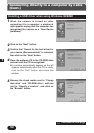
The trim screen appears. Set the top left corner point of the desired picture.
Move the vertical and horizontal lines using one of the following methods:
Moves the contact point between the vertical
and horizontal lines to the top left corner.
Moves the contact point
between the vertical and
horizontal lines to the
bottom right corner.
Moves the horizontal line up.
Moves the vertical
line to the right.
Moves the horizontal line
down.
Moves the vertical line to the left.
CANCEL
SETUP
~
Continued on next page
When the zoom lever is moved toward W, the intersection
point (green) moves toward the top left corner of the display.
When the zoom lever is moved toward T, the intersection point
(green) moves toward the bottom right corner of the display
When the lever is moved, frame lines (white) appear on
opposite sides from the trimming lines (green).