


160
6
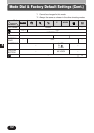
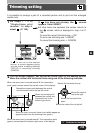
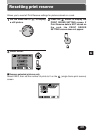
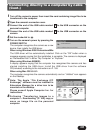
Trimming setting (Cont.)
3
Press to save the
top left corner point.
4
The screen changes to the one for setting the
bottom right corner point. The methods for
moving the vertical and horizontal lines are the
same as described in step 2.
●To change the top left corner point, press the
button.
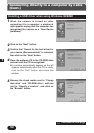
5
Press to save the bottom right
corner point. The trimming size is
displayed for approx. 1 second.
6
Select OK on the screen, which
is displayed in step 1. The screen
returns to the screen.
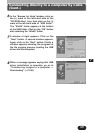
7
To save the setting, press to exit
from the selection screen.
8
Press the button twice. The
screen exits from the Print Reserve
mode to return to the playback
mode.
●The size of the printed picture varies depending on the printer setting. If the trimmed
picture size is small, printing magnification increases according, resulting in a printed
picture with lower resolution.
●For best results with close-up prints, it is recommended to use the TIFF, SHQ or HQ
mode.
●The vertical to horizontal ratio in the trimming screen can be changed using the
Arrow pad, but if the zoom lever is used, the ratio is fixed at 4:3.
Note:
CANCEL
RESET
O K
When the lever is moved,
frame lines (white) appear
on opposite sides from the
trimming lines (green).
When the zoom lever is moved
toward W, the intersection point
(green) moves toward the top
left corner of the display.
When the zoom lever is moved
toward T, the intersection point
(green) moves toward the
bottom right corner of the
display