


12
Operating the osd menu of a remote camera
To set the advanced settings of a remote camera, operate the menu superimposed on the image output of the remote camera (this menu is referred to
as the OSD menu in this manual). The OSD menu of a connected remote camera can be operated from the unit.
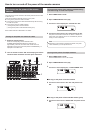
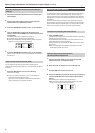
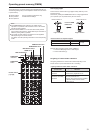
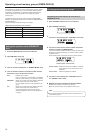
CAMERA OSD button
F1 dial
F2 dial
EXIT button
1.
Hold down the CAMERA OSD button to turn on its indicator.
The OSD menu appears on the selected remote camera and becomes able to be operated from the unit.
2.
Operate the OSD menu.
Use the F1 dial, F2 dial, and EXIT button to operate the OSD menu.
Operation differs depending on the model connected.
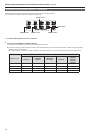
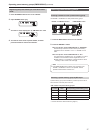
<Table of operations>
Remote camera Dial/button operation OSD menu operation
AW-HE50
AW-HE60
AW-HE120
Turn the F1 dial.
z Moves the items
(*1)
.
z Selects a setting
(*2)
.
Press the F1 dial. Confirms the change to the selected setting.
Press the EXIT button. Cancels the selected setting.
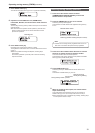
AK-HC1500
AK-HC1800
AW-HE870
Turn the F1 dial.
z Moves the items
(*1)
.
z Selects a setting
(*3)
.
Press the F1 dial. Confirms the change to the selected setting.
Press the EXIT button. Cancels the selected setting.
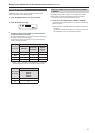
AW-E350
AW-E650
AW-E750
AW-E860
AW-HE100
Turn the F1 dial. Moves the items
(*1)
.
Press the F1 dial. Confirms the sub-menu selection.
Turn the F2 dial.
z Changes the setting directly
(*4)
z Confirms the sub-menu selection.
(*1) Turn clockwise : Moves the items up.
Turn counterclockwise : Moves the items down.
(*2) Turn clockwise : Changes the setting in the plus (+) direction.
Turn counterclockwise : Changes the setting in the minus (–) direction.
(*3) Turn clockwise : Changes the setting in the minus (–) direction.
Turn counterclockwise : Changes the setting in the plus (+) direction.
(*4) Turning the dial changes the setting and instantaneously reflects the new value on the remote camera.
Turn clockwise : Changes the setting in the plus (+) direction and confirms the value.
Turn counterclockwise : Changes the setting in the minus (–) direction and confirms the value.
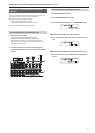
3.
Hold down the CAMERA OSD button to turn off its indicator.
The menus of the unit become able to be operated.
z When the unit is operating the OSD menu of a remote camera, the CAMERA OSD button lighting state and OSD menu display state may no
longer match and OSD menu operation may not be able to be performed properly if the OSD menu OFF operation is performed for the same
remote camera from, for example, another remote camera controller or a wireless remote controller.
In such a case, hold down the CAMERA OSD button on the unit, and after the CAMERA OSD button lighting state (off) and OSD menu display
state (OSD menu hidden) match, hold down the CAMERA OSD button again and then perform the operation.
z If a camera selection button [CAMERA SELECT/GROUP SELECT] is pressed to switch to another remote camera to control from the unit during
the display of the OSD menu of a remote camera, the OSD menu of the remote camera that was selected disappears.
z For details on the menu items that are displayed, check the operating instructions for the corresponding model.
Notes