


1-27
DXC-D35/D35WS(UC)
DXC-D35P/D35WSP(CE) V1
52
Chapter 4 Viewfinder Screen Indications and Menus
Chapter 4 Viewfinder Screen Indications and Menus
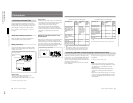
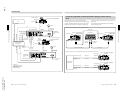
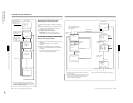
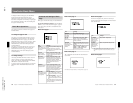
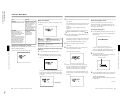
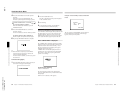
Displaying the advanced menu and
switching to the normal indications
Use the following procedure to display the advanced
menu.
1 Move the POWER switch to the ON position while
holding down the UP/ON button to display the
advanced menu selection screen.
2 To display advanced menu page 2
immediately, move the cursor to the menu
number and then press the DOWN/OFF button.
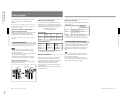
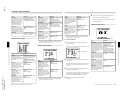
To reinitialize all settings in the advanced
menu to their factory defaults
1 Align the cursor to ALL RESET and press the UP/
ON button.
(The indication changes to “ALL RESET
SURE?”.)
2 Press the UP/ON button again. (The indication
changes to “ALL RESET OK” and reinitialization
completes.)
To cancel the reinitialization, move the cursor
instead of pressing the UP/ON button.
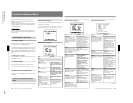
Display by moving the
POWER switch to the
ON position.
Normal indications
Page 1
Page 2
Page 8
a)
Switch by pressing the
MENU/STATUS switch up.
Switch by pressing
the MENU/STATUS
switch down.
Basic menu
Display by holding the
MENU/STATUS switch up
while the normal
indications are present.
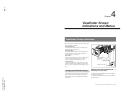
a) The menu configuration differs according to the camera
head’s switch settings, the connected VTR, and the type of
input signal. An eight-page configuration results when all of
the basic menu pages are displayed.
c
TITLE IND?
(YEScv)
c
A.IRIS : ± 0
DTL LEV: ± 0
M.BLACK: ± 0
STRETCH: ± 0
SHUTTER: OFF
c
SKIN DTL: OFF
DL LEV : STD
PRE.WHT : 3200
REC
TAKE
TCG 12:34:56:00
W:A
NG
CLIPM
198
F5.6
0dB
56ND
:LOW LIGHT 99 04 01
SS :1/100 10:00
AM
WHITE : AUTO/A
A.IRIS: STD
FILE : STD
DCC+ : OFF
SS :OFF
BATT:13.0V
Status indications
Viewfinder Screen Indications
Chapter 4 Viewfinder Screen Indications and Menus
53
Chapter 4 Viewfinder Screen Indications and Menus
cPAGE 1(NEXTcVPREVcv)
ALL RESET
(YEScv)
EXIT MENU (YEScv)
PAGE 1(NEXTcV PREVcv)
cALL RESET SURE?
(YEScv)
EXIT MENU (YEScv)
cPAGE15(NEXTcV PREVcv)
SETUP NAVI
CAMERAcTAPE
STORE DATA
(YEScv)
EXIT MENU (YEScv)
cPAGE2 (NEXTcV PREVcv)
GAIN
HIGH: 18dB
MID : 9dB
LOW : OdB
DL : ON
EXIT MENU (YEScv)
cPAGE3 (NEXTcV PREVcv)
AWB MEM : 2
TONE : OFF
BARS : SMPTE
REMOTE1 : REC
REMOTE2 : MARK
BAUD RATE: 9600
EXIT MENU (YEScv)
PAGE1 (NEXTcV PREVcv)
cALL RESET OK!
EXIT MENU (YEScv)
TCG 12:34:56:00
W:A
CLIPM
198
F5.6
0dB
3200
99 04 01
SS :1/100 10:00
AM
a) Set the cursor to the page number and press the UP/ON or
DOWN/OFF button.
b) The menu configuration differs according the camera head’s
switch settings, the connected VTR, and the type of input
signal. A 15-page configuration results when all of the
advanced menu pages are displayed.
c) Set the cursor to EXIT MENU and press the UP/ON button.
Move the POWER switch to the
ON position with the UP/ON
button held down
UP/ON button
a)
Align the cursor to ALL
RESET and press the
UP/ON button.
Confirmation
screen
DOWN/OFF button
a)
UP/ON
button
c)
Normal indications
UP/ON
button
c)
UP/ON or DOWN/
OFF button
a)
page 3
page 2
page 15
b)
UP/ON button
c)
DOWN/OFF button
a)
UP/ON or DOWN/
OFF button
a)
Advanced menu
page 1
UP/ON
button
a)
Press the UP/
ON button.
Move the cursor.
Move the cursor.