


1-41
DXC-D35/D35WS(UC)
DXC-D35P/D35WSP(CE) V1
80
Chapter 5 Adjustments and Settings
Chapter 5 Adjustments and Settings
4
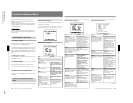
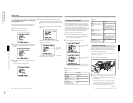
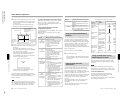
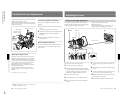
Arrange a white subject (paper, cloth, etc.) under
the same lighting conditions as for shooting, and
zoom in on it so that as far as possible the whole
screen is white.
The minimum white area requirements for the
adjustment are shown in the following figure.
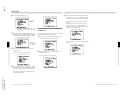
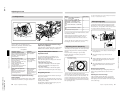
5
Push the WHT/BLK switch in the WHT direction
and release.
The white balance adjustment is carried out.
During the adjustment the legend “AUTO WHITE
-OP-” appears in the viewfinder.
After a few seconds the adjustment is complete,
and the legend in the viewfinder changes to
“AUTO WHITE -OK-” plus a color temperature,
as shown in the following figure.
AUTO WHITE
-OK-
3200K
The adjustment value is automatically saved in
memory A or B as selected above.
To save the white balance adjustment for different
lighting conditions, repeat steps 2 to 4 above. You can
save two different values for the white balance, in
memories A and B.
Note
When using a camera control unit or remote control
unit, if the W/B BALANCE switch of the control unit
is set to PRESET or MANUAL, it is not possible to
carry out white balance adjustment on the camera.
To recall a white balance value from memory
Before beginning shooting, set the W. BAL switch to
the A or B position. This automatically sets the
camera to the white balance adjustment saved in the
corresponding memory.
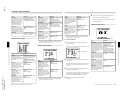
If white balance adjustment cannot be
completed automatically
The warning message “AUTO WHITE -NG-” appears
in the viewfinder.
Make the necessary corrections, then carry out the
process again.
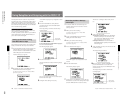
Warning messages for white balance adjustment
White Balance Adjustment
Center of the screen
Area of white within this
rectangle should be
equivalent to at least 10% of
the image area.
approximately
70% of the
height of the
image
approximately
70% of the
width of the
image
AUTO WHITE
-NG-
:C.TEMP.LOW
CHG.FILTER
TRY AGAIN
The color temperature is too low. Try
the following, in this order of
precedence.
(1) If the FILTER control is in position 2,
3 or 4, change it to position 1, then
retry the adjustment.
(2) Check that the subject is completely
white, then retry the adjustment.
(3) The color temperature may be
outside the range of the camera. Fit
an appropriate color temperature
conversion filter, then retry the
adjustment.
AUTO WHITE
-NG-
:C.TEMP.HI
CHG.FILTER
TRY AGAIN
The color temperature is too high. Try
the following, in this order of
precedence.
(1) If the FILTER control is in position 1,
change it to position 2, 3 or 4, then
retry the adjustment.
(2) Check that the subject is completely
white, then retry the adjustment.
(3) The color temperature may be
outside the range of the camera. Fit
an appropriate color temperature
conversion filter, then retry the
adjustment.
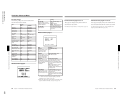
Message
Meaning and corrections to be made
AUTO WHITE
-NG-
:LOW LIGHT
TRY AGAIN
Light level is too low.
• Increase the illumination level, open
the iris, or use the GAIN switch to
increase the video signal level.
• Check the setting of the FILTER
control.
• After these checks, retry the
adjustment.
AUTO WHITE
-NG-
: ??
TRY AGAIN
The subject is not white, or the lighting
level is too high.
• Use a white subject.
• Lower the illumination level, stop down
the iris, or use the GAIN switch to
decrease the video signal level.
• Check the setting of the FILTER
control.
• After these checks, retry the
adjustment.
Chapter 5 Adjustments and Settings
81
Chapter 5 Adjustments and Settings
Using the Preset White Balance
Settings
The camera provides two preset white balance settings,
for instant shooting with approximately the correct
adjustment. The preset white balance can be selected
between 2200 K and 4300 K when the FILTER control
is set to 1 and between 4600 K and 12000 K when the
FILTER control is set to 2, 3 or 4 (see page 59).
There are also particular shooting conditions under
which the preset values may give better results than the
human eye adjustment.
1
Set the W. BAL switch to PRESET.
2
Set the FILTER control.
The white balance is automatically adjusted for the
preset white balance selected in basic menu page 2
(see page 59).
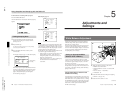
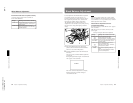
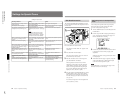
Light Sources and Color
Temperature
Adjustment of the white balance to match the light
source is essential to ensure correct color rendering.
The color of a light source is indicated as a color
temperature in kelvins (K). It is higher for bluish light,
and lower for reddish light. When the camera is
shipped it is adjusted for use with video lights (halogen
lamps with a color temperature of 3200 K). For use
with other light sources, therefore, adjustment is
required.
First use the FILTER control to set the approximate
color temperature, then carry out white balance
adjustment.
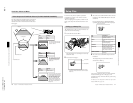
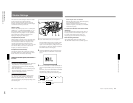
The following table shows typical color temperature
values for different light sources.
WHITE:PRESET
The W. BAL switch is in the PRESET
position.
Move the W. BAL switch to the A or B
position.
The camera is outputting a color bar
signal.
Move the OUTPUT/DL/DCC+ switch to
one of the CAM positions.
Message
Meaning and corrections to be made
BARS
Light source
Natural Artificial
Color temperature (K)
Clear sky 10,000
Light cloud 8,000
Cloudy or rainy
skies
Blue light 7,000
6,000
Fluorescent light
(daylight white)
5,000
Direct sunlight,
noon
Mercury lighting
Fluorescent light
(white)
White light
One hour after
sunrise or
before sunset
Fluorescent light
(warm white)
4,000
3,500
Studio lighting 3,200
Halogen lamps
and video lights
Yellow light 3,000
2,500
Thirty minutes
after sunrise or
before sunset
Incandescent
lighting
Sodium street-
lighting
Sunrise or
sunset
Candlelight Red light 2,000
V
v
V
v
V
v
V
Color temperatures of different light sources
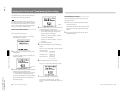
Using the ATW (Auto Tracing
White Balance) Function
The ATW function continuously adjusts the white
balance automatically to adapt to changes in lighting
conditions.
Note
Depending on the shooting conditions, automatic
adjustment may not necessarily give optimum results.
For the best possible results, use the W. BAL switch.
To use the ATW function
Press the ATW button turning the indicator on.
This activates the ATW function, and the ATW
indication appears in the viewfinder.
To disable the ATW function, press the ATW button
again, turning the indicator off.