


1-45
DXC-D35/D35WS(UC)
DXC-D35P/D35WSP(CE) V1
88
Chapter 5 Adjustments and Settings
Chapter 5 Adjustments and Settings
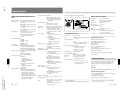
Viewfinder Screen Adjustments
The following adjustments are provided to improve the
visibility of the viewfinder screen.
Although these adjustment may make the viewfinder
image clearer, they have no effect on the output video
signal from the camera.
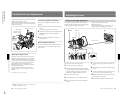
Adjusting the eyepiece focus
Depending on the eyesight of the camera operator —
whether longsighted or shortsighted — the optimal
position of the viewfinder image varies. Adjust the
eyepiece focus to get the clearest viewfinder image for
your eyesight. First focus the image with the lens,
then adjust the eyepiece focusing knob. The
adjustment range is from –3 to 0 diopters
1)
(default
when shipped is 0 diopters).
Using an optional part allows you to modify the
adjustment range to –2 to +1 diopters or –0.5 to +3
diopters.
For details, consult your Sony dealer.
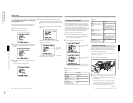
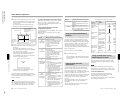
Contrast and brightness adjustment
Carry out these adjustments with the color bars
displayed.
1
Set the OUTPUT/DL/DCC+ switch to the BARS
position.
The color bars appear in the viewfinder.
2
Watching the color bars, turn the CONTRAST and
BRIGHT controls to adjust the contrast and
brightness.
3
Return the OUTPUT/DL/DCC+ switch to its
original position.
Outline emphasis adjustment
Turning the PEAKING control changes the degree of
outline emphasis in the viewfinder image, to make
focusing easier.
1) Diopter: A unit to indicate the degree of convergence or
divergence of a bundle of rays.
..........................................................................................................................................................................................................
PEAKING control
CONTRAST control
BRIGHT control
Eyepiece focusing knob
OUTPUT/DL/
DCC+ switch
Chapter 5 Adjustments and Settings
89
Chapter 5 Adjustments and Settings
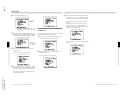
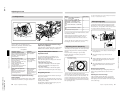
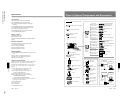
RET
IRIS
W
T
M
A
ZOOM
MANU.SERVO
9
4,11 2 1
3
86 57
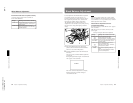
Adjusting the Lens
Flange Focal Length Adjustment
It is necessary to adjust the flange focal length (the
distance from the lens flange to the plane of the image
along the optical axis) in the following cases.
•When a lens is fitted for the first time
•After changing lenses
•When during zoom operations the focus does not
match properly from telephoto to wide angle
1
Set the iris selector to the M position.
2
Turn the iris ring to f/1.8 (fully open).
3
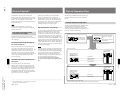
Place the supplied flange focal length adjustment
test chart at a range of about 3 meters (10 feet), and
adjust the lighting so that an appropriate video
output level is obtained with the iris at f/1.8.
4
Loosen the F.B fixing screw.
5
Set the ZOOM selector to the MANU. position.
6
Move the manual zoom control to the telephoto
position.
7
Turn the focusing ring so that the test chart is in
focus.
8
Move the manual zoom control to the wide angle
position.
9
Turn the F.B adjustment ring so that the test chart
is in focus. Do not move the focusing ring.
10
Repeat steps 6 to 9 until the image stays in focus
from telephoto to wide angle.
11
After adjustment, tighten the F.B fixing screw.
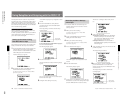
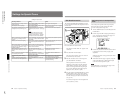
About 3 m (10 feet)
Flange focal length
adjustment test chart