


1-47
DXC-D35/D35WS(UC)
DXC-D35P/D35WSP(CE) V1
92
Chapter 5 Adjustments and Settings
Chapter 5 Adjustments and Settings
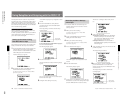
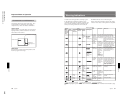
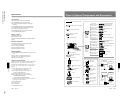
Settings for special cases
The background is very bright, and the
subject is too dark.
Settings for Special Cases
Setting Effect
Set the A.IRIS MODE switch to BACK L,
turning the indicator on.
This lightens the foreground.
The subject is under a spotlight. Set the A.IRIS MODE switch tp SPOT L,
turning the indicator on.
This prevents white burn-out in highlights
of faces and clothes.
The subject is completely still (e.g. when
shooting documents, drawings, etc.).
Enable the EVS (Enhanced Vertical
definition System) function.
(See page
84.)
Note
Enabling the EVS function tends to
increase the occurrence of aliasing
problems (moiré patterns). Therefore,
normally leave the function disabled.
This enhances the vertical resolution.
When you wish to give a lush effect, as
when shooting a wedding or similar
occasion.
Use the HI SAT file. (Access advanced
menu page 10 with the SET UP switch
set to FILE.)
This increases the saturation of primary
colors.
Shooting under fluorescent lighting. Use the FL file. (Access advanced menu
page 10 with the SET UP switch set to
FILE.)
This eliminates the blue-green cast, and
restores natural hues.
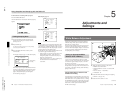
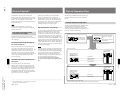
Shooting conditions
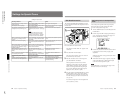
When shooting bright areas mixed with
dark areas (Example: A person indoors
looking through a window at a bright
landscape outdoors)
Set DL to ON in the advanced menu
page 2 and, then set the OUTPUT/DL/
DCC+ switch to CAM DL.
Prevents white breakup and color faults
in bright areas.
When adjusting for skin detail or tone
(Example: When shooting to hide skin
details)
See “Skin Detail Correction” or
“Adjusting Color in the Specified Area”
(page 93)
.
Adjusts the skin detail or tone to a
designated active area.
When you wish to give pictures a natural
taste created by film camera.
Use the FILMLIKE file. (Access
advanced menu page 10 with the SET
UP switch set to FILE.)
The “filmlike” effect is added to the
picture.
To make focusing before shooting
easier.
Press the EZ FOCUS button, turning the
“easy focus” function on.
This opens the iris, to make it easier to
focus before beginning shooting.
To begin shooting immediately when
there is no time to make adjustments.
Set the EZ MODE switch to the ON
position.
This provides automatic adjustment to a
set of standard values, to allow
immediate shooting.
Chapter 5 Adjustments and Settings
93
Chapter 5 Adjustments and Settings
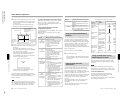
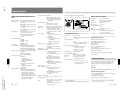
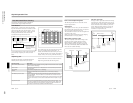
Skin Detail Correction
The DXC-D35/D35P/D35WSL/D35WSPL provides
an easy push-button function that designates an active
skin tone area.
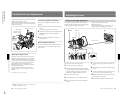
1
Set the SKIN DTL switch to ON.
The indication “SKIN AREA: ±0” appears in the
viewfinder.
2
Press the SKIN DTL SET button.
This causes the area detect cursor to be shown in
the viewfinder (for 10 seconds).
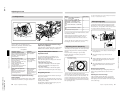
3
Place the area detect cursor on the target, then
press the SKIN DTL SET button.
This designates the correction area, which is
indicated by a zebra pattern, and the indication
“SKIN AREA: ±0” appears again. If the area
detect cursor disappears before designating the
area, press the SKIN DTL SET button again to
display the cursor. (Return to step 2.)
4
Press the UP/ON or DOWN/OFF button to change
the SKIN AREA value (–99 to +99)so that the
zebra pattern may be displayed in the target area.
Use basic menu page 2 to set the correction level
(see page 59).
You can also change color in the designated area
(see the following section).
2,3
1
ON
OFF
SET
SKIN DTL
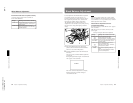
Adjusting Color in the Specified
Area
You can adjust the specified color using setup files.
Perform the same procedure with the skin detail
correction to designate the target area .
1
Turn the POWER switch on with holding down the
UP/ON button.
2
Perform steps 1 and 2 in “Changing File Settings”
(page 73) and display advanced menu page 12 in
the most suitable file for shooting.
3
Perform the procedure for the skin detail correction
to designate the area to which you apply color
adjustment.
While this procedure is being performed, the menu
is not displayed.
4
When advanced menu page 12 appears, change the
value of the SKIN SAT or SKIN HUE to adjust
color in the area designated in step 3.
Note
Set the SKIN DTL to 1.0 in basic menu page 2 if the
skin detail correction is unnecessary.