24
Rulers
Selecting Show Rulers from the Display menu will cause rulers to be displayed on the top and left
edges of the preview image. Command-R (Control-R in Windows) can also be used to turn rulers on
and off. e rulers are shown in the current units selected on the Size tab panel. e origin for the
rulers is set by default to the upper-left corner of the preview. e origin can be changed by clicking
on the upper-left corner of the rulers and dragging into the preview image. e origin will be set to
the location where the mouse is released. e ruler origin can be returned to the default setting by
double-clicking in the upper-left corner of the rulers.
Guides
Clicking on a ruler and dragging into the preview image will create a guide line. Clicking on the
horizontal ruler will create a horizontal guide and a vertical guide is created by clicking and dragging
from the vertical ruler. A guide line can be deleted by clicking on it and dragging it back to it’s origi
-
nal ruler or all guide lines can be deleted by selecting Clear Guides from the Display menu. A guide
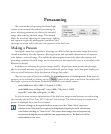
line may be repositioned by moving the mouse over the guide line until the mouse changes to a
or cursor, then click and drag the guide line to its new position. Guide lines will be displayed or
hidden when the rulers are shown or hidden by the Command-R (Control-R in Windows) key com
-
bination.
e guide line color and style may be selected by moving the cursor over a guide line until the
cursor changes to a or . At this position double-click the mouse (double right-click in Windows)
and the guide line attribute window will appear. Select the desired attributes and click OK to close
the window.


