


32
If Auto Naming is active, you can add more words, edit or replace the auto entry data by
editing the entry in the filename field on the main control panel before the scan is made.
e image file name will have a “.tif” filetype extension automatically appended to the filename
when saved to the host computer. e computer’s operating system may, or may not, display this
extension in the file name, depending on the system settings.
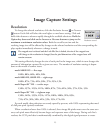
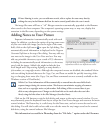
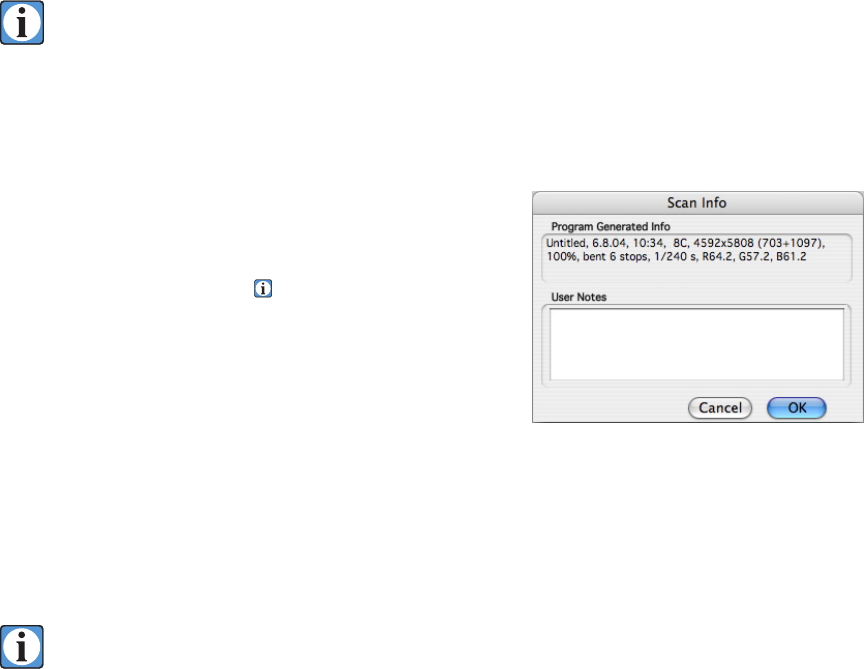
Adding Notes to Your Picture
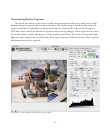
Exposure information is automatically saved with each
image. In addition, you have the option of saving some notes
of your own with each image. Just to the right of the name
field, click on the Info
button to open the Info dialog. e
automatically-saved information is displayed in the Program
Generated Info box at the top of the dialog. You may add any
text note to the image in the User Notes text box. You may
add any printable characters, up to a total of 255 characters,
including the automatically-saved information, to the notes
saved with the image. Added info might include the lens
focal length and f-stop setting, lighting or setup details, a
job number, or a copyright notice. Although the computer’s menus are disabled, the standard Macin
-
tosh text editing keyboard shortcuts for Copy, Cut, and Paste are usable for quickly inserting, delet
-
ing, or changing these notes (the Copy, Cut, and Paste commands are not currently available on the
Windows version of ViewFinder).
All the User Notes information will be automatically re-entered into the notes field of sub-
sequent images during the current session. is feature can minimize retyping of common
data, such as a copyright notice or job number. Full editing of this re-entered data is pos
-
sible on any subsequent scan. Changes to the Scan Info can be made after the scan is fin
-
ished, using the Info editor in the File Manager (described later).
Click on the OK button to exit the Info dialog and return to the main control window. Or you
may alternately press the keyboard Enter key to accept the User Notes changes and return to the main
control window. e Return key is a valid entry for the Notes text, and so it cannot be used to exit
this dialog. You will also be able to later add to or edit the notes for any images saved to the camera’s
disk drive, using the control software File Manager.
is information is accessible in Photoshop from the “File Info...” option under the File menu.
Scan Info dialog box showing automatically saved
information and the user defined note section.