


93
Appendix F
Panoramic Adapter
e Better Light Pano/WideView can capture images for three types of panoramas; scene, rollout
and object. Scene panoramas are when the camera is turned to capture an image of it’s surroundings.
A rollout panorama is a single image of the surface of an object as it is turned. An object panorama is
a sequence of images of an object at fixed positions as it is turned.
Scene Panorama
Hardware Setup
Affix the camera to the armature of the panorama stepper stage unit. e lens should be posi-
tioned so that when the armature is placed on the stepper stage, the nodal point of the lens should be
directly over the center of the rotating stage. For some cameras, such as field cameras, this may not
be possible if the front of the camera must be lowered below the camera back. In this instance, the
camera can be attached sideways to the armature, making certain the lowered camera front will clear
the motor as the armature is moved around.
Select the rotation direction with the small toggle switch next to the connector on the panoramic
motor stage. If the insert protrudes from the left side of the camera, the switch handle should point
to the left. If the insert protrudes from the right side of the camera, the switch handle should point to
the right. In addition to controlling the direction of rotation, the registration of the image is affected
by this switch setting.
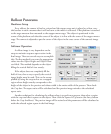
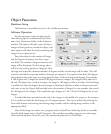
Software Operation
First, go into the Preferences and be certain
the Enable Pano Mode checkbox is checked. Set
up your exposure and focus as you would nor
-
mally. en click the Panorama button on the
toolbar. e Pano tab panel will be activated.
Select
Scene from the radio buttons at the top of
the tab panel.
To make a scene panorama, the software
requires two item; the focal length of the lens
and the number of degrees of rotation. Enter the
focal length in the provided text field. It is not