


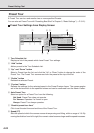

4-28
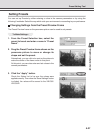
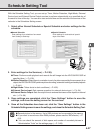
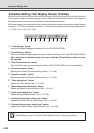
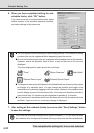
Schedule Setting Tool Display Screen (Toolbar)
There are two kinds of Schedule settings, Normal Schedule and Special Schedule. The buttons in
the toolbar below can be used for both Normal and Special Schedules.
With these buttons, you can load and save setting information, stop communication, select Normal
schedule (→ P.4-29) and Special schedule (→ P.4-33) as well as open each service setting screen
(→ P.4-39, 4-41, 4-52, 4-54, 4-56).
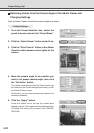
q “Load Settings” button
Loads the schedule settings currently set in the VB-C50i/VB-C50iR.
w “Save Settings” button
Saves the schedule setting edited using the Schedule Setting Tool to the VB-C50i/VB-C50iR.
After setting the schedule function, be sure to click the “Save Settings” button to save
the settings.
e “Stop Communication” button
Click this button during communication with the VB-C50i/VB-C50iR to cut the connection.
r “Normal schedule” button
Displays the Normal Schedule Setting screen (→ P.4-29).
t “Special schedule” button
Displays the Special Schedule Setting screen (→ P.4-33).
y “Timer setting tool” button
Opens the Timer Setting Tool (→ P.4-39).
u “Motion detection setting tool” button
Opens the Motion Detection Setting Tool (→ P.4-41).
i “Night mode setting tool” button
Opens the Night Mode Setting Tool (→ P.4-52).
o “External device input setting tool” button
Opens the External Device Input Setting Tool (→ P.4-54).
!0 “External device output setting tool” button
Opens the External Device Output Setting Tool (→ P.4-56).
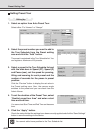
Note
After setting, be sure to click the “Save Settings” button to save the settings.
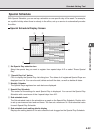
Schedule Setting Tool
q w e r t y u i o !0