


Operation
Document 800-05056 Rev C 67
11/09
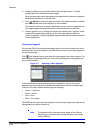
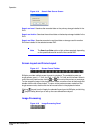
2. Selecting a date from the calendar initiates the time-lapse search. This also
enables dates with available recorded images.
When first entering the time-lapse search, the latest date with recorded images will
be selected (highlighted) in the calendar.
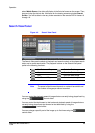
3. Click (Reload) to reload the date information. Recorded information available
from the selected date will be displayed on the timetable.
The recorded data for all cameras is displayed by time in one-hour segments and
bar-shaped segments indicate that there is recorded data during that time.
4. Select a specific hour by clicking the mouse on the desired hour segment. Video
images will be played back starting with the first image captured within the
one-hour segment. A yellow-highlighted segment indicates the selected time that
will be played back.
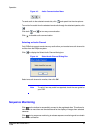
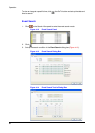
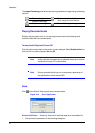
Choosing a Segment
If the remote DVR’s time and date have been reset to a time that is earlier than some
recorded video, then it is possible for the DVR to have more than one video segment in
the same time range.
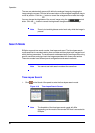
Click (the Segment button) and select the video segment you want to search. The
active segment is highlighted with pink, and the inactive segment is highlighted with
gray on the timetable.
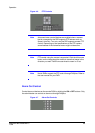
Figure 4-11 Selecting a Video Segment
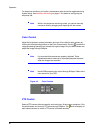
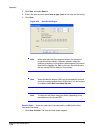
The recorded data for each camera channel is displayed by time in one-minute
segments and a red vertical line indicates the selected time that will be played back.
The color of the bar indicates different types of recording:
• Yellow = Pre-Event
• Purple = Event
•Red = Panic
•Blue = Time-Lapse
If the DVR has more than one video segment in the same time range, each segment will
be separated by a yellow vertical line.
Note The timetable of the time-lapse search panel will be different
depending on the model of the remote DVR that is connected
through RASplus.