


121
Memo :
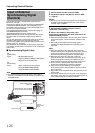
● If you do not want to save the file, select [Cancel] or press
the [CANCEL] button to return to the previous screen.
● When saving of a file fails, a AStore Error!B message
(indicated in red frame) appears for several seconds, after
which the previous screen is displayed.
8 Saving is complete.
After saving of the file is complete, ACompleteB appears on
the screen, and the menu screen closes automatically.
Loading a Setup File
1 Display the [Setup File Manage] menu.
Select the [Setup File Manage] menu on the [Main Menu]
screen, and press the Set button (
R). (A Page 97)
2 Select [Load File] and press the Set button (R).
3 Select [Scene File] or [Picture File], and press the Set
button (
R).
The existing files are displayed.
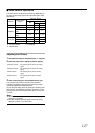
4 Select the file to load using the cross-shaped
button (
JK), and press the Set button (R).
Memo :
● When the write-protect switch of the inserted SDHC card
is set, a mark appears beside the SDHC card icon.
Setup files can be loaded from an SDHC card even if the
write-protect switch is set.
● A mark is displayed at the right end when there are
some settings that are not supported by the setup file
(e.g., picture files saved using the GY-HM700 series).
These files can be loaded by this camera recorder, but
some of the settings will not be compatible. (A Page 119)
● Setup files that are completely incompatible will not be
displayed. (A Page 119)
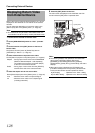
5 Select [Load] on the confirmation screen, and press
the Set button (
R).
Loading starts, and ALoading...B appears on the screen.
Memo :
● If you do not want to load the file, select [Cancel] or press
the [CANCEL] button to return to the previous screen.
● When loading of a file fails, a ALoad Error!B message
(indicated in red frame) appears for several seconds, after
which the previous screen is displayed.
6 Loading is complete.
After loading of the file is complete, ACompleteB appears on
the screen, and the menu screen closes automatically.
Resetting Setup Files
1 Display the [Setup File Manage] menu.
Select the [Setup File Manage] menu on the [Main Menu]
screen, and press the Set button (
R). (A Page 97)
2 Select [Reset File] and press the Set button (R).
3 Select [Scene File] or [Picture File], and press the Set
button (
R).
The existing files are displayed.
4 Select the file to delete using the cross-shaped
button (
JK), and press the Set button (R).
Memo :
●
Scene files and preset scene files stored inside the SDHC
card cannot be selected or reset.
5 Select [Reset] on the confirmation screen, and press
the Set button (
R).
Deletion starts, and AResetting...B appears on the screen.
Memo :
● If you do not want to reset the file, select [Cancel] or press
the [CANCEL] button to return to the previous screen.
6 Resetting is complete.
After resetting of the file is complete, ACompleteB appears on
the screen, and the menu screen closes automatically.
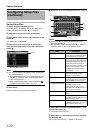
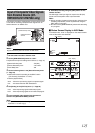
7
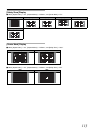
[Load File] Menu Screen
Cursor
5