


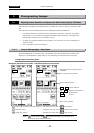


.SETUP. VI Basic Operations
1 Preparations Before Photographing
- 38 -
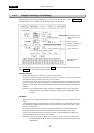
"XGA (LCD ON) LCD Color" is initially selected for Power On Settings. When using an
external monitor, select "SXGA (LCD OFF)," "XGA (LCD OFF)," or "XGA (LCD ON)."
4) Colors may not display correctly, depending on the external monitor connected to the
system. If this is the case, you can adjust color settings using the color adjustment
function for the external monitor or via Display (VGA LCD) Color Adjustment in the Power
On Settings screen.
5) Press SAVE to save your settings. Turn the DS-L1 back on again.
NOTE: Because no images are displayed on the internal monitor when SXGA or
XGA (LCD OFF) is selected, you cannot work with the DS-L1 without an
external monitor after making these selections. To change settings, hold
down the MENU button on the main unit while you turn on the power. (Keep
the MENU button depressed until startup is completed.) Images will be
output temporarily to the internal monitor. Select XGA in Power On Settings
and press SAVE .
When using an LCD monitor or an LCD projector
Adjust settings on the display side (e.g., on the monitor or projector) using the chart
incorporated in the DS-L1. Follow the procedure described below to make this adjustment.
1) Connect an external monitor to the DS-L1.
2) Turn on the power for the DS-L1. Give the unit about 20 minutes to warm up. Also, make
sure the display has time to warm up sufficiently, in accordance with the instruction
manual.
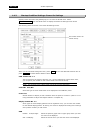
3) Display a menu and select the [SETUP] tag on it to enter the SETUP menu. Select
Additional… from the SETUP menu to go on to the Additional Settings screen.
4) Press the LCD Chart at the lower right corner of the screen. A 1-dot pitched,
monochrome mesh chart will be displayed.
5) Adjust the clock phase and clock pitch on the display side. Refer to the instruction manual
provided with your display for detailed information on performing adjustments. Some
monitors have an automatic adjustment function. Press NEXT→ to output a 16-level
gray-scale chart. This chart can be used for reference when adjusting the output level or
contrast of the display.
6) Once you have finished adjusting the display, turn the DS-L1 back on again.
1.4.5 Settings for Direct Print
Before images can be output directly to a printer, you must enter a direct print license first.
NOTE: Contact your nearest Nikon representative for information on how to
purchase a direct print license.
Follow the procedure described below to set a direct print license.
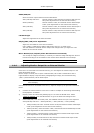
1) Display a menu and select the [SETUP] tag on it to enter the SETUP menu. Select
Additional… from the SETUP menu to go on to the Additional Settings screen.
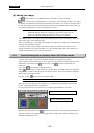
2) If a direct print license has not been obtained, the Printer column of the screen will be
marked by a caution mark !!License!! . Press !!License!! , and an input window will
appear.
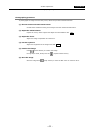
3) Enter the license code in this input window and press the Ent . This completes the
settings. You do not need to restart the DS-L1 after making this setting.