


VI Basic Operations TOOL
3 Measuring Two-point Distance or Entering Information—TOOL Menu
- 69 -
3.3.2 Using the Count Marker (to Count the Number of Points)
The count marker is a convenient function because it displays numbers in the order in which
markers have been attached. Attach a marker to each point on the image, and you can count
the number of points easily.
NOTE: You need a mouse to use this function.
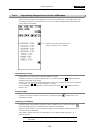
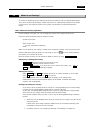
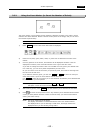
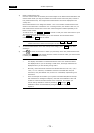
1) Press Marker . The tool bar shown below will be displayed.
2) Press the red, blue, green, black, white, or yellow icon to determine the color of the
marker.
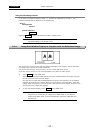
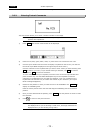
3) Click any position on the screen, and markers will be displayed. Numbers 1-99 are
displayed on markers, with counts also shown to the right of the color icons.
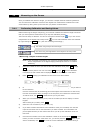
If you wan to change the marker color in the middle of counts, press your desired color
icon. That way, you can count points independently for each color.
Or you can return to one of the colors you previously used, and continue counting from
the last count of that color.
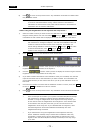
If you failed to mark any point, you can use Undo or Redo to cancel or redo your
most recent action. Up to 10 recent actions can be retrieved.
Use Clear to erase all the content you’ve now entered. All markers you’ve attached will
be erased unless you have pasted.
NOTE: If you put a marker in the middle of Undo or Redo , recent actions from
that point in time cannot be canceled or redone.
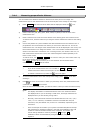
4) After marking points, press Paste to fix the markers you’ve attached as valid data.
5) Press to return to the previous menu. Any markers you’ve attached will be erased
unless you have pasted. Once the content is fixed as valid, you cannot erase without
erasing the entire overlay.
NOTE: The count values cannot be saved.
The display information is interlocked with the menu size. Small markers
are displayed when you are showing a small menu, and large markers are
displayed when you are showing a large menu.