


VI Basic Operations CAMERA
2 Photographing Images
- 63 -
2.3
Outputting Images Directly to a Printer
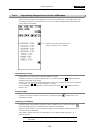
2.3.1 Printing an Image
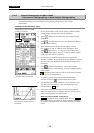
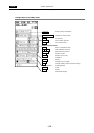
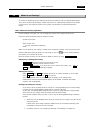
When operating from a shortcut menu or the REC menu, use the print icon to print.
When selecting CP900D printer or a PictBridge-supporting printer in the Additional Settings
screen of the SETUP menu window, a print icon either or respectively, is displayed.
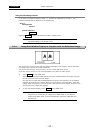
When operating from the main unit panel switch or the DS Remote Controller DS-CR, you must
choose Print for Capture Function in Additional Settings of the SETUP menu before you can print.
NOTE:
* The icon cannot be selected unless a printer is connected to the system.
* If a license has not been obtained, the icon is displayed in black and white.
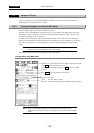
2.3.2 Various Print Related Settings
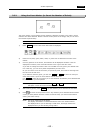
When CP900D printer is selected, the following various settings can be chosen:
Choosing print mode
The direct print function allows you to print in either normal or real 10 mode.
Choose print mode in Additional Settings of the SETUP menu.
Normal print mode
Unless the Mag.Fix check box in Additional Settings is selected, images are printed in
normal mode by default. In this mode, an image is enlarged or reduced as will be suitable
for the printer’s paper size before being printed.
Real 10 print mode
If the Mag.Fix check box in Additional Settings is selected, images are printed in real 10
mode. When printing in this mode, always be sure to use the relay lens (optional).
Use the x0.7 relay lens for 5M cameras and the x0.55 relay lens for 2M cameras.
The scaling factor in this mode is equal to 10 times the objective magnification. For
example, if you are using a x40 objective, the print scaling factor is x400.
The size of the subject can be calculated backward from the printed size and the objective
magnification. (Subject size = subject size as printed / objective magnification / 10)
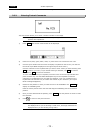
Adjusting the printing condition
Use Additional Settings of the SETUP menu to adjust the printing condition.
Bright
Use it to adjust the brightness of a print. Use the left button to make it darker or the right
button to make it brighter.
R_GAIN, G_GAIN, B_GAIN
You can adjust the gain of each R, G and B color individually.
CMP. 90-110%
Use it to adjust the scaling factor during real 10 (Mag.fix) mode. Errors in optical
magnification can be adjusted. Try printing a subject whose size is known and measure its
printed size. If an error is found, correct. Repeat a sequence of correction, printing and
measurement several times until an exact value is obtained.