


.TOOL. VI Basic Operations
3 Measuring Two-point Distance or Entering Information—TOOL Menu
- 78 -
3.5
Adjusting the Subject Position and Comparing Sizes
3.5.1 Using Crosshairs to Adjust the Subject Position
You can display crosshairs on the screen and use it to adjust the center or the horizontal or
vertical position of the subject.
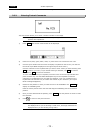
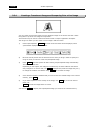
1) Press Cross , and crosshairs will be displayed.
2) Point to the center of the crosshairs and click the mouse button. Hold down the button
while you move the mouse. The position of the crosshairs moves as you move the mouse.
3) When the crosshairs position is where you want it, release the mouse button to set that
position.
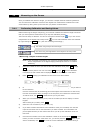
4) To change the size and color of the crosshairs, press Color . There are two crosshairs
sizes: a full-size crosshairs and a center-only crosshairs. The color can be selected from
seven colors: red, green, cyan, yellow, magenta, white, or black.
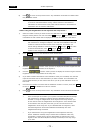
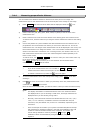
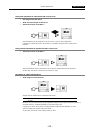
5) Press Set to bring up the tool shown below. This tool allows you to select a display
mode for the crosshairs that suits the subject whose position you want to adjust.
6) “Radius” is an option that displays a concentric circle along with the crosshairs, with
respect to its center. The numbers 20 to 360 in the Radius menu indicate the radius of the
displayed concentric circle (in pixel units). Select the check box for any number to display
a concentric circle whose radius corresponds to your selected number. By selecting
multiple numbers, you can display concentric circles with different radiuses.
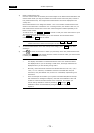
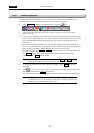
7) “Crosshairs” is an option that allows you to select the line type of crosshairs. Select the
“Normal” check box, and the crosshairs will become a solid line. When you select the
“Dotted” check box, the crosshairs is drawn with broken lines.