


.CAMERA. VI Basic Operations
2 Photographing Images
- 54 -
If a red or sky blue bar is displayed during automatic exposure (AE), you are outside the
exposure controllable range. Therefore, adjust the amount of incident light by adjusting the
luminous energy of the light source or the iris diaphragm or by using an ND filter.
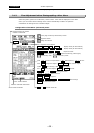
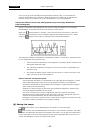
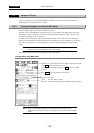
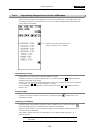
Confirm the effective level of the photographed image from image distribution
(with a histogram).
The DS-L1 calculates image distribution from a frozen image and displays it as a histogram
(HISTOGRAM). This function cannot be used unless you use a mouse.
Right-click
(freeze button) in the Advn. menu with the mouse, and the DS-L1 will start
calculating image distribution, with a histogram displayed at the bottom of the menu.
When
using the
(exposure start button), histograms are automatically displayed.
This histogram indicates the distribution of brightness of each R, G and B color, and can be used
for fine adjustment of the exposure level.
• The horizontal axis indicates the color brightness: increasingly darker toward the left
and brighter toward the right.
• The vertical axis indicates the frequency of occurrence, which is normalized by the
maximum value.
• The average histogram values of each color are shown in numeric form at the right
edge, and shown by levels at the bottom.
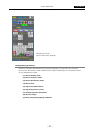
How to read and set exposure levels
If the brightness distribution is concentrated on the right edge of the histogram, it means
that the highlighted parts of the screen are saturated. Conversely, if the brightness
distribution concentrates on the left edge of the histogram, it means that the low-lighted
parts of the screen are blacked out.
Although it is ideal if no parts on the screen are saturated or blacked out, exposure may
have to be adjusted depending on the subject.
If an area of interest on the screen is highlighted, adjust the exposure so that the
distribution will be shifted toward the left. If an area of interest is low-lighted, adjust the
exposure so that the distribution will be shifted toward the right.
Knowing the exact level of exposure that is needed while you adjust the exposure will help
to prevent insufficient gradation during image processing.
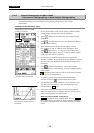
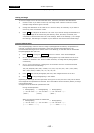
(8) Saving the image
Use (Capt. button) or the CAPTURE button on the DS-L1 to save the image.
(Capt. button) and the CAPTURE button on the DS-L1 are functionally the same. The image
is saved to the destination that has been assigned to the button. You can also use these buttons
to print the image. Look at the LED located by the side of the CAPTURE button on the DS-L1 to
confirm the destination to which the image will be saved.