


.CAMERA. VI Basic Operations
2 Photographing Images
- 52 -
2) Next, adjust the exposure.
It would be ideal if the amount of incident light can be adjusted in such a way that the
shutter speed falls within a range of about 1/7.5 to 1/250 seconds. To adjust the amount
of incident light, adjust the luminous energy of the light source or the iris diaphragm or
use an ND filter.
3) Press WB while in this state, and the white balance will be automatically adjusted.
The white balance can also be adjusted from a frozen image.
1) While photographing an evenly white subject, press (freeze button) to freeze the
display.
2) Press WB while in this state, and the white balance will be automatically adjusted.
3) Press (freeze button) again to release the frozen display, thus completing your
settings.
In case of over- or underexposure, the white balance cannot be adjusted precisely.
Be especially careful if you are performing exposure in “MANU” mode or using a
low-magnification objective.
To correct the automatically set white balance, use the R / B con for Gain to adjust the
balance.
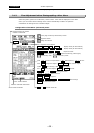
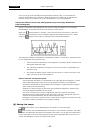
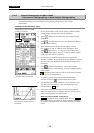
(6) Adjusting the picture quality
The Advn. menu has various functions for adjusting the picture quality. Watch the monitor while
you adjust the picture quality as necessary.
Sharpness SHP0 to SHP5
A sharp video image will be obtained by enhancing the contours of the image. The
sharpness can be adjusted in six steps, from 0 (off) to 5 (strong).
Noise reduction NR ON / NR OFF
Selecting “NR ON” helps to reduce noise on the screen, resulting in a clear image.
Lag or tails on moving objects may occur when “NR ON” is selected. When photographing
a moving subject or if an increased response during focusing is desired, select “NR OFF.”
Black level SFT +00
If you want to eliminate flare reflection in blacks on the screen or make blacks on the
screen more distinct, adjust the black level to the negative side.
Image level Gain Y100
Use this facility when fine adjustment in “AE” or “MANU” exposure mode has no effect.
Gain is referenced to Y100 = 100%, and can be fine adjusted in increments of 5%.
The feature of this facility is that correction can be applied to a frozen image, as well as to
normal images.
Be aware that lowering the image level below Y100 causes the output saturation level to
drop.
Color density CHRM. +00
To increase the color density in the image being displayed, adjust CHRM to the positive
side. To reduce the density of color, adjust CHRM to the negative side. The density of color
can be adjusted in the range from –50 to 50.
Hue HUE +00
Use this facility when you want to rotate hues in minute color adjustments.