


VI Basic Operations CAMERA
2 Photographing Images
- 53 -
Watch the image while you make adjustments. Also, be careful not to forget to reverse
previous settings.
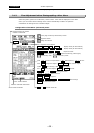
Effects COLOR / B&W / NEGA / BlueB / Sepia
You can choose color effects on an image from the following five choices:
• COLOR This is the normal color image output.
• B&W This is a monochrome image. Use this effect for monochromatic
subjects such as DIC or PH and metal tissue.
• Nega With the brightness reversed, this is used as a special effect.
• BlueBack Blacks in Nega are turned blue. This is used as a special effect.
• Sepia With colors developed in sepia, this is used as a special effect.
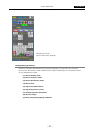
Shading correction SD OFF / SD10% to SD 50% / SD US1 / SD US2
Correct unevenness in shades on the screen.
To correct for a reduction in luminous energy from the middle part toward the periphery of
the screen, use 10% to 50% correction data.
Watch the screen while you select the correction data.
When you are correcting nonsymmetrical unevenness, etc., follow the procedure described
below to save the contents of your corrections. The saved data can be called onto the
screen later for when you are correcting other images.
1) Be sure to remove dust from the optical path if it is visible on the screen.
2) Set the screen to become evenly white overall except for the subject.
3) Adjust the amount of incident light so that while using AE or MANU exposure, the
shutter speed is in the range of about 1/7.5 to 1/250 seconds.
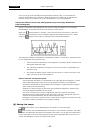
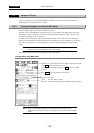
4) Press REG. to enter the Registration menu.
5) Press SD Set . If shading correction has been set normally, you will see 1 2
Save displayed on the screen. Select the number in which you want to save your
settings, and press Save to save.
Note that shading can be corrected up to about 50%. If the shading correctable range is
exceeded, an “SD Data Error!!” message will be displayed.
To correct shading with the saved data, choose the shading correction icon SD US1 or
SD US2 from the Advn. menu.
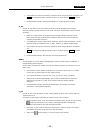
(7) Confirming exposure information
There are two methods to confirm the exposure information. After confirmation, adjust the
exposure as necessary.
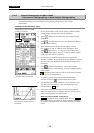
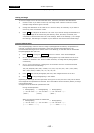
Confirm that you are within the controllable exposure range (with a level meter or an error message).
Use a level meter or an error message on the upper right corner of the screen to check the drift
from the exposure level that the DS-L1 has determined to be optimum.
Because the exposure level considered to be optimum varies with each subject, the level
determined by the DS-L1 should be regarded as an approximate guide.
The optimum range for the level meter is indicated by a green bar. As the exposure becomes
excessive, it changes color to red. In cases of underexposure, it becomes a sky blue bar. An
“Exposure Over!!” or “Exposure Under!!” message will be displayed if overexposure or
underexposure is recognized.