


.CAMERA. VI Basic Operations
2 Photographing Images
- 48 -
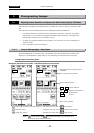
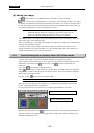
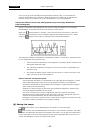
(1) Choosing display mode
Display mode here refers to one that is used to determine how an image is displayed on the
screen.
Feeling or features of camera operation vary with a combination of display mode and the source
you use during photographing. Refer to “Outline Guide to Source (Photographing Mode)
Settings” in “1.4.2 Image File Settings-File Settings” Chapter VI.
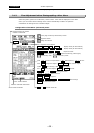
Sample settings that suit different uses are described below. Try these settings before
determining your own settings.
• Fine-adjusting the focus for a subject consisting of minute patterns → 1.3Mp, 5Mi, or
2Mfull
Ex.: Semiconductor pattern, low-magnification photography of cells and tissue,
fluorescent photography, landscape photography with a lens
• Moving the subject while observing → 1.3Mp, 2Mfull, or 800*5
Ex.: Semiconductor pattern, stereoscopic microscope observation, cell diagnosis,
general photography with a lens
• Focusing on a dark subject → 1.3Mi, 800*6
Ex.: Position or focus adjustment during fluorescent photography, nighttime
photography with a lens
• Photographing a dark subject in the shortest time possible → 1.3Mi, 800*6
Ex.: Fluorescent photography, nighttime photography with a lens
• Photographing a bright subject with priority placed on focusing → C.Scan
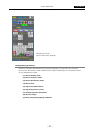
(2) Choosing exposure mode
Choose your desired exposure mode from “PROG,” “S_AE,” “MANU” or “F_AE.” Normally, “PROG”
should be selected.
Sample settings for different uses are described below. Try these settings before determining
your own settings.
• Photographing a moving subject → S_AE (combination with “1.3Mp”, “2Mfull”, or “800*5”
display mode)
• Eliminating fluctuations of exposure for moving subjects or when moving a subject while
observing → MANU or use AE_L in PROG
• Photographing under the same conditions at all times → MANU
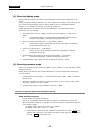
Features of exposure modes and instructions on use
PROG: Automatic exposure
Choose “PROG” for general photography.
The DS-L1 automatically determines exposure based on a combination of the shutter
speed and camera sensitivity. In this case, the electronic shutter is automatically adjusted
in the following range.
For display modes other than C.Scan: 1 s to 1/1000 s
For display mode C.Scan, 1/15 s to 1/1000 s
• If the image is excessively bri ght, adjust the compensation icon CMP. +00 to the
negative side. Conversely, if the image is excessively dark, adjust the compensation
icon CMP. +00 to the positive side.