46 C1695M-B (11/08)
MOTION DETECTION SETUP
The DVR5100 allows you to select three different zones per camera for the built-in video motion detection. Each zone can be enabled and
configured independently. Each zone allows an unlimited number of areas to be designated as corresponding to the parameters of that zone.
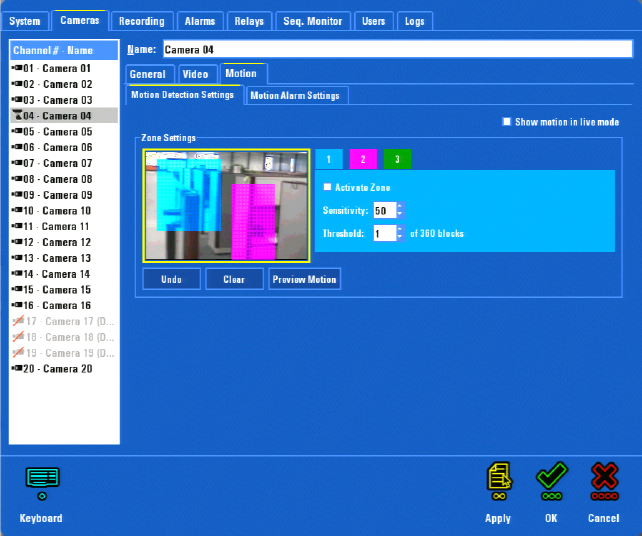
When setting up each zone, select “Activate zone” to enable video motion detection in that zone (refer to Figure 46).
Figure 46. Cameras Motion Screen
To set up motion detection:
1. Select the Motion tab. If necessary, select the Motion Detection Settings tab.
2. Select the camera to be configured from the camera list.
3. Select the zone you want to configure.
4. Select Activate Zone (disabled by default). This selection starts the motion detection service and activates the 24-hour motion recording
schedule. Activate Zone allows you to show or hide the pixel changes in live view, trigger a motion-based recording schedule, and receive
motion alarm notifications.
5. Draw the motion detection area:
Mouse: Click and drag the mouse to draw the desired area for motion detection. The currently selected zone button is surrounded by a pale
square border, and the corresponding zone color is applied to the zone.
[Control panel:
• Use the joystick to enter the preview pane, and then press Enter/Shift.
• Move the joystick up, down, right, or left to move to form the desired zone.
• Press Plus or Minus to add or remove a block from the motion detection zone. Press these buttons repeatedly without moving to another
block to increase or decrease the size.
• Press Enter/Shift after the zone is completed.]
6. Set the sensitivity level and threshold for the zone. The threshold is measured by the number of blocks in the frame.
7. Select Preview Motion. The Preview Motion command allows you to conduct a walk test to ensure that the sensitivity and threshold
settings are appropriate for the scene.
8. Select Undo to revert back to the original settings
9. Select Clear to delete all of the defined motion detection zones.
