C1695M-B (11/08) 61
CHANGING A USER PASSWORD
To change a user password:
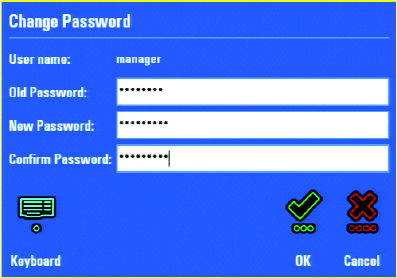
1. Click the Change Password command and the Change Password dialog box appears.
Figure 67. Change Password Dialog Box
2. Use the keyboard and mouse [or the on-screen keyboard] to modify the password as follows:
a. Enter the old password.
b. Enter the new password.
c. Re-enter the new password, and then click OK.
ASSIGNING A USER ROLE
To assign a user role, select a role from the Role list. Be sure to select a role that provides permissions to the system features required for this
user. For example, if the user must review diagnostic information about devices, including the DVR, you should select the Administrator or
Manager role. Refer to the DVR5100 Remote Client Operation manual for more information about creating and modifying roles.
SELECTING AN EXPORT AND SNAPSHOT FORMAT
To select an export or snapshot format:
1. Select an export format from the “Default export format” box. The options are Pelco Video Files With Player (*.pef); Pelco Video Files
Without Player (*.pef); and QuickTime
®
MPEG-4 Files (*.3gp). The default file format is .pef.
2. Select a format for snapshots from the “Default snapshot format” box. The options are Windows Bitmap Files (*.bmp) and Portable
Network Graphics Files (*.png). The default file format is .bmp.
CONFIGURING ALARM NOTIFICATION
To configure an alarm notification:
1. Select a user from the list.
2. Under Alarm Notification, navigate to the following options and select the notification settings that apply for the selected user.
• Sound notification: Click “Sound notification” to alert the user with an audible sound each time an alarm occurs. To disable sound
notification,” clear the “Sound notification” check box.
• Snooze: Select the number of minutes before alarms will reappear on the Alarm Notification screen.
• Alarm severity: Check the “Display warning for alarms with severity” level for the appropriate user notifications. Select all severity
levels that apply.
