


Installing and Removing a Fan Tray
3-16 Matrix X4-C Chassis Setup
Installing and Removing a Fan Tray
TheMatrixX4‐Cchassisisequippedwithremovablefantraysthatallowforeasyperiodic
replacementifafanfails.Toinstallandremoveafantray,referto“InstallingaFanTray”on
page 3‐16and“RemovingaFanTray”onpage 3‐17.
Installing a Fan Tray
Toinstallafantray,refertothefiguresbelowasindicatedinthestepsbelow andproceedas
follows:
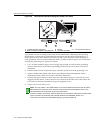
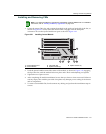
1. LocatetheESDwriststrapshippedwiththeMatrixX4‐Cchassis.AttachtheESDwriststrap
toyourwristandplugthecablefromtheESDwriststrapintothe
ESDgroundingreceptacle
atthebottomofthechassisasshowninFigure 3‐9.
2. Unpackthefantraybytakingitfromitsshippingboxandremovinganypackagingmaterials.
(Savetheshippingboxandmaterialsintheeventtheunitmustbereshipped.)
3. Removethefantrayfromitsprotective
plasticbag.
4. Examinethefantraycarefully,checkingfordamage.Ifanydamageisnoted,donotinstallit.
ContactEnterasysNetworksforinstructions.
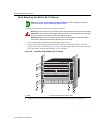
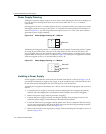
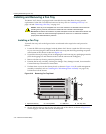
5. Unfastenthreescrewsonthefantraybezel,asshowninFigure 3 ‐16.(Ifacablemanagement
assemblyisinstalled,referto“InstallingtheCableManagementAssembly
”onpage 3‐35.)
Pullthebezeloffthechassis.
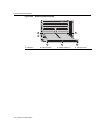
Figure 3-16 Removing Fan Tray Bezel
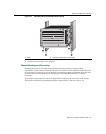
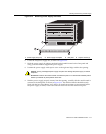
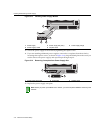
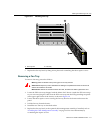
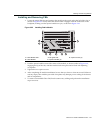
6. Slowlyslidethefantrayintotheopenslotatthesideofthechassis,asshowninFigure 3‐17,
untilitengageswiththeconnectoronthebackplane.
Caution: A fan tray is hot-swappable. Do not run the chassis for an extended interval without an
operating fan tray, however, because the chassis will soon overheat and be damaged.
Precaución: El sistema de ventilación se puede reemplazar cuando la unidad está encendida. Sin
embargo, no utilice el chasis durante largos períodos sin contar con un sistema de ventilación
porque podría sobrecalentarse y dañarse.
1 Captive screws (3) 2 Fan tray bezel 3 IOM slot 1 4 Fan tray slot 1
FM2
FM1
S/N: MAC ADD.
GROUND
STRAP
CM2
CM1
4
3
2
1
FAN
TRAY
1
FAN
TRAY
2
X4
CM2
CM1
4
3
2
1
FAN
TRAY
Matrix
X4
FAN
TRAY
1
1
2
1
4
3