


Powering Up the Matrix X4-C Chassis
Matrix X4-C Chassis Installation Guide 3-37
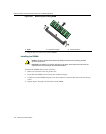
6. Reattachthebartothecablemanagementassemblybytighteningthetwo(2)captivescrews
onthebar.
7. Ifyouwishtoremoveacablestrap,simplyunscrewitfromthecablemanagementbasepanel.
Powering Up the Matrix X4-C Chassis
TopoweruptheMatrixX4‐Cchassis,proceedasfollows:
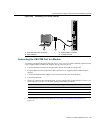
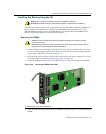
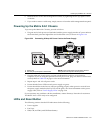
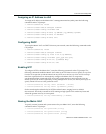
1. Plugoneendofeachpowercord(includedwiththepowersupply)intotheACpowerinleton
thechassisbackpanelandtightenthecordlockbracketscrew,asshowninFigure 3‐34.
Figure 3-34 Connecting 20 Amp AC Power Cord to the Power Supply
2. Plugtheotherendofeachpowercordintoadedicated20 A/110 Vacor10 A/220 Vac
receptacle.Ifyouareusingtheoptionaltwistlockpowercord,plugitinandturnuntilitlocks
securely.RefertoTable A‐6onpage A ‐3for moreinformation.
3. Repeatsteps1and2forall
powercords.
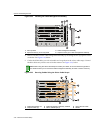
4. EnsurethatthePowerLEDsoneachpowersupplyaregreen.
5. Ensurethatallfansinthefantrayunitareoperatingproperlywhenpowerisreceivedfrom
thepowersupplymodules(fantrayLEDwillbegreen).Formoreinformationonthepower
supplyLEDs,referto“Power
SupplyLEDs”onpage 3‐38.
Ifyouexperienceanyproblemswiththisinstallation,contactEnterasys Networksforassistance.
TheMatrixX4‐Cisnowreadytobeconfigured.
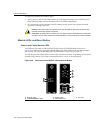
LEDs and Reset Button
Thefollowingsectionsdesc ribeLEDindicationsforthefollowing:
•Powersupplies
•FanTrays
•IOM,CM,andFMs(withCMResetbutton)
1 Power cord NOTE: Power cords shown are for North America.
2 AC inlet (AC1) with power cord bracket Each power unit requires a 20 Amp circuit.
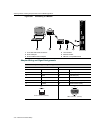
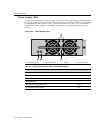
AC INLET 3
100 - 125V ~ 15A
200 - 240V ~ 8A
50/60 Hz
AC INLET 2
100 - 125V ~ 15A
200 - 240V ~ 8A
50/60 Hz
AC INLET 1
100 - 125V ~ 15A
200 - 240V ~ 8A
50/60 Hz
CAUTION: THIS UNIT MAY HAVE MORE THAN ONE
POWER SUPPLY CORD. DISCONNECT THREE (3)
POWER SUPPLY CORDS BEFORE SERVICING TO
AVOID ELECTRIC SHOCK.
VORSICHT: DIESES GERÄT HAT MEHR ALS EINEN
NETZANSSCHLUß. TRENNEN SIE VOR
WARTUNGSARBEITEN DIE 3 NETZANSCHLÜSSE VOM
NETZ, UM ELEKTRISCHE SCHLÄGE ZU VERMEIDEN.
1
2