


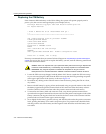

Installing and Removing Modules
3-18 Matrix X4-C Chassis Setup
Installing and Removing Modules
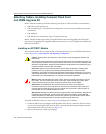
Installing and Removing IOMs
ThissectiondescribestheinstallationofIOMs,andFabricandControlModules.Althoughyou
canpopulateanyemptyslotwithitsappropriatemodule,allchassisaredeliveredwithout
coverplatesontheIOM,andFabricandControlModuleslotslabeledas1.Slotsacceptmodules
thataresizedappropriatelyforthose
slotsonly.Thatis,onlyIOMscanfitintoIOMslots,Fabric
ModulesintoFMslots,andControlModulesintoCMslots.
ToinstallanIOM module,refertothefiguresasindicatedinthestepsbelowandproceedas
follows:
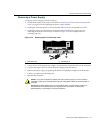
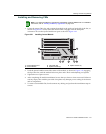
1. LocatetheESDwriststrapshippedwiththeMatrixX4‐C
chassis.Attach theESDwriststrap
toyourwristandplugthecablefromtheESDwriststrapintotheESDgroundingreceptacle
atthebottomofthechassisasshowninFigure 3‐9.
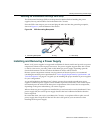
2. Unpackthemodulebytakingitfromitsshippingboxandremovinganypackagingmaterials,
and
removingthemodulefromitsprotectiveplasticbag.(Savetheshippingboxand
materialsintheeventtheunitmustbereshipped.)
3. Examinethemodulecarefully,checkingfordamage.Ifanydamageisfound,donotinstallit.
ContactEnterasysNetworksforinstructions.
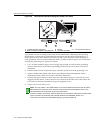
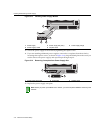
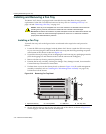
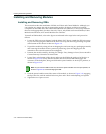
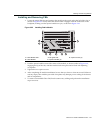
4. LocateSlot1atthebottomofthechassis
andinserttheIOMintheguiderailoftheslot,as
showninFigure 3‐18.GentlyslidethemoduleintotherackuntiltheIOMengagesthe
connectoronthebackplane,beingcarefulthattheejectorhandlesareintheopenposition,as
showninFigure 3‐19.
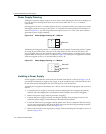
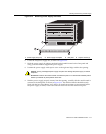
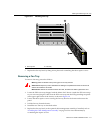
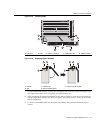
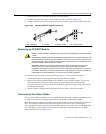
5. Pushthe
ejectorhandlestowardthecenterofthemodule,asshowninFigure 3‐19,engaging
thelipoftheslot,untilthemodulelocks intoplaceandisflushwithadjoiningcoverplates.
6. Tightenthetwocaptivescrews.
Note: As you insert the IOM into the slot, be sure the ejector handles are in the open position, as
shown in Figure 3-19, to avoid damaging the IOM.