


. . . . . . . . . . . . . . . . . . . . . . . . . . . . .
6-4 Accessing Camera Images
4. Choose KODAK DCS 400/EOS•DCS from the IMPORT submenu of the
Adobe Photoshop 4.0 F
ILE menu.
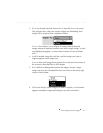
NOTES: For earlier supported versions of Photoshop, choose the driver from
the A
CQUIRE submenu of the FILE menu.
O
PEN from the FILE menu will not acquire images from the camera.
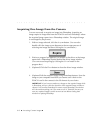
5. Wait as the driver image window appears. If you see a message that
the camera was not found, or that the calibration file cannot be found,
refer to the “Messages” section of chapter 8.
The driver can display images from a variety of supported Kodak
camera types. This means that you can use the same PCMCIA card
with different supported Kodak cameras and view all of the images
with the same driver.
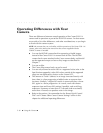
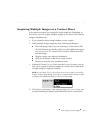
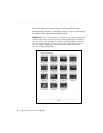
KEY TO FIGURE: All driver features are identified by letter in the following figure. Many of
these features are introduced in this chapter, but not explained in detail; however, full
explanations of all features appear in order by these letters in chapter 8.
A. Source Menu N. Acquire Button
B. View Menu O. Copy To Button
C. Active Photoshop Menus P. Delete Button
D. Acquire As Menu Q. Done Button
E. Take Picture Icon R. Annotation Area
F. Camera Control Icon S. Image Information Window
G. Preferences Icon T. Navigation Bar
H. Rename Images Icon U. Select All Icon
I. Rotate Clockwise/Counterclockwise Icons V. Number of Images Selected
J. Crop Icon W. X-Y Cursor Location
K. Lighting Menu X. RGB Values at the Cursor Location
L. Click-Balance Tool Y. Thumbnail/Preview Size Menu
M. Sound Menu