


. . . . . . . . . . . . . . . . . . . . . . . . . . . . .
Accessing Camera Images 6-27
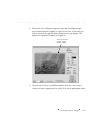
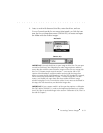
4. As prompted by a message that appears in the driver image window,
click the Take Picture icon (or use the shutter release to take a
picture). The camera takes a picture and displays it in the image area.
5. (Optional) If the “test” picture is one that you want to keep, click the
K
EEP button, and the image is saved to the PCMCIA card in the cam-
era. (The C
OPY TO button becomes the KEEP button when in TEST SHOT.)
6. (Optional) Adjust your studio settings as needed (reposition lighting,
etc.) and then take an additional test picture.
7. (Optional) Click the K
EEP button to save the image, or click the Take
Picture icon to take another picture — it replaces the previous image
which is not saved. (If you do not clicked K
EEP, a message warns you
that you are about to lose the current image.)
8. Choose C
ONTACT SHEET or PREVIEW from the VIEW menu (to leave TEST
SHOT). Subsequent images you take will be recorded on the PCMCIA
card in the camera.
9. Take additional images as desired.
10. Color balance, crop, rename, and annotate images as described in
earlier sections of this chapter.
11. Acquire images as described earlier in this chapter.
IMPORTANT: If you have not made any changes to the acquired image while
in Photoshop, and you click the close box of the acquired image window or