


. . . . . . . . . . . . . . . . . . . . . . . . . . . . .
Reference — Camera 7-11
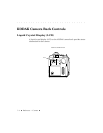
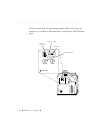
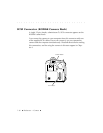
DELETE Button and Delete Indicator
You use the DELETE button to delete the most recent image on the
PCMCIA card.
IMPORTANT: If you inadvertently delete images, an emergency procedure
provides an opportunity for you to recover images if you do so before making any
additional images. Refer to the explanation of the R
ECOVER button in Chapter 8.
To use the DELETE button, if you are not connected to a computer or the
AC battery charger/adapter, first turn on the camera system and lightly
press the shutter release button to wake the camera. (If you are connected
to a computer that is “on,” or to the AC battery charger/adapter, the
camera back will be “on;” you do not need to turn on the camera.) Then
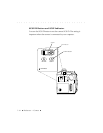
press the DELETE button once to wake delete mode. The characters “DEL”
— the delete indicator — appear on the camera back LCD. Then press
DELETE again to delete the last image.
As long as the characters “DEL” appear on the LCD, you can press the
DELETE button again and again to delete additional images. With each
press the frames remaining indicator on the camera back increases by
one, indicating that there is now room for one additional image on the
PCMCIA card. The frame counter in the camera top LCD does not change
as a result of deleting an image.