


. . . . . . . . . . . . . . . . . . . . . . . . . . . . .
8-34 Reference — Kodak Driver Software
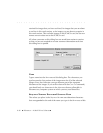
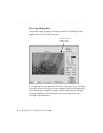
action for all of the selected images. You can also type a specific image
number in the navigation edit ‘go to’ box in the middle of the navigation
bar to display that image. When you click OK the current cropping
rectangle is applied to
all
images in the selection set.
K. Lighting Menu
These options apply only to color images, and not to images taken with
monochrome camera models. The lighting menu provides a simple, direct
method of quickly applying one of several lighting choices to your image.
Then later, once the image has been acquired, you can refine it if needed
in Photoshop.
NOTES: In addition to the choices on this menu, the driver provides a click-
balance lighting tool described in the next section. Lighting can be set with either
lighting option. However, lighting choices are mutually exclusive; you cannot
apply one type of lighting and then refine it with another. Instead, each time you
apply any color balancing, your previous choice is lost, and only the current
lighting setting is applied.
Click-balance is always the preferred method of applying color balancing to
images. If you have applied click-balance to an image, you must turn it off (as
described in the next section), before you can apply a choice from this lighting
menu.
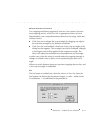
After selecting images, you should select an option from the lighting menu
to correspond to the original lighting conditions under which you made
the images. Choices are D
AYLIGHT, TUNGSTEN, FLUORESCENT, and FLASH. The
option you select is stored with the images on the PCMCIA card in the