


. . . . . . . . . . . . . . . . . . . . . . . . . . . . .
Reference — Kodak Driver Software 8-37
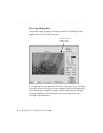
area where each of the red (R), green (G), and blue (B) color values
displayed below the image are as high as possible, but lower than 255.
After you click, you view the result of the change immediately on the
image.
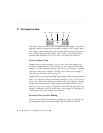
To apply the same click-balance settings to multiple images at the same
time, select the images from the contact sheet, and then view them in
PREVIEW, where they appear as a stack of images. Now when you click-
balance the top image, the color balancing resulting from your actions is
applied to all of the selected images in the stack and is stored with all of
the images. Use the navigation tool to move through the stack of pre-
viewed images to ensure that the color balancing is appropriate for all
images.
You can change the click-balance point by repeating the procedures
described above and clicking a different point; or you can remove the
click-balance setting for one or more images by selecting them and
clicking the click-balance checkbox “off.”
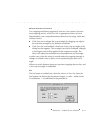
NOTES: When you click, you may see a message indicating that ONE OF THE COLORS
IS
SATURATED, AND ASKING YOU TO CLICK ANOTHER POINT FOR BALANCING. As prompted,
click another point.
If there is no white or light gray area in the image, take a photograph of a neutral
gray or white card (for example KODAK Gray Cards, Publication No. R-27) under
the same lighting conditions that existed when the image was taken. Then select
the image of the card as well as all other images taken under the same lighting
conditions. Follow the procedures described above to set a click-balance point,
however, to set the correct value, click the special cursor on the image of the
card, rather than one of the other images.
The checkbox for this tool may contain a minus sign “–” instead of being blank or
containing an “X.” The minus sign appears when you have selected multiple
images and they do not all have the same lighting settings.