


. . . . . . . . . . . . . . . . . . . . . . . . . . . . .
Using the Camera 5-13
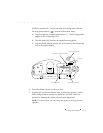
4. Press this DELETE button once with your fingertip or a blunt object;
this action wakes delete mode. The characters “DEL” appear on the
camera back LCD.
5. While “DEL” still appears on the LCD, press the DELETE button again.
The most current image — based on image date and time — is
deleted. The red Card Busy light will flicker, indicating that the image
is being deleted from the PCMCIA card.
6. (Optional) Press the DELETE button again — repeatedly if you wish —
to delete another picture(s).
NOTES: As each image is deleted the frames remaining indicator on the camera
back increases by one, indicating that there is now room for one additional image
on the PCMCIA card. The frame counter in the camera-top LCD does not change
as a result of deleting an image.
Only image files are deleted. Sound files (described just below), or other files that
may be on the disk are not deleted.
Use this feature with care since it is possible that you may unknowingly delete the
“wrong” image. This can occur since the camera deletes the image with the most
current date and time. Perhaps you have used the PCMCIA card to take pictures,
and then the camera or PCMCIA card has been used by another photographer. If
you now delete an image, you will delete images from the other photographer
since they have the most current date and time stamp.
If you inadvertently delete images, an emergency procedure provides an opportu-
nity for you to recover images if you do so before taking any additional pictures.
Refer to the explanation of the R
ECOVER button in Chapter 8.
Additionally, since the PCMCIA card is DOS formatted, if you have an IBM PC or
compatible computer with a PCMCIA card reader and disk utility software with
file recovery features, you may be able to recover image and sound files while
working with that utility software.