


19
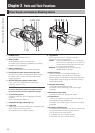
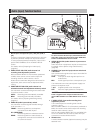
Chapter 2 Parts and their Functions
Shooting and Recording/Playback Functions Section
1 2 3
16 17 18
7 8 9 10 1112 13 14 15
㻯㻭㻹㻱㻾㻭 㻾㻱㻹㻻㼀㻱
㻯㻻㻺㼂㻚
㻲㻻㻯㼁㻿㻌㻌㻵㻾㻵㻿
㼆㻻㻻㻹㻛㻿㻛㻿
4
19
5 6
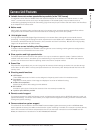
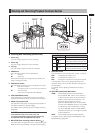
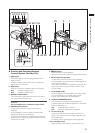
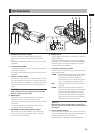
Shooting and Recording (camera unit)
1 Focus ring
Use this using to adjust the focus manually.
2
Zoom ring
Use this using to adjust the zoom manually.
3
Iris ring
Use this using to adjust the lens iris manually.
4
ZOOM lever
Use this lever to perform zoom operations.
T: Zoom in
W: Zoom out
Press the lever lightly to change the zoom slowly, and
hard to change it quickly.
5
IRIS selector switch
Use this switch to select the lens iris adjustment mode.
M: Manual iris mode
To adjust the iris, turn the iris ring on the lens.
W: Auto iris mode
The lens iris is adjusted automatically.
6
IRIS (PUSH AUTO) button
Press this button in manual iris mode. The lens iris is
adjusted automatically while you hold down the button.
7
CONV. (convergence) dial
Use this dial to adjust the convergence point (depth of
the reference place for the 3D image).
For details, refer to [Adjusting the Convergence Point]
(page 54).
NOTE
Lens operations such as iris, zoom, focus, and
convergence adjustments cannot be performed during
synchronization with the GENLOCK input signal.
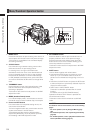
8 ND FILTER (filter switching) selector button ( )
Use this button to adjust the amount of light entering the
MOS sensor during shooting in strong outdoor lighting.
Setting Description
1
CLEAR
Does not use the ND filter.
2
1/4
Reduces the amount of light
entering the MOS sensor to 1/4.
3
1/16
Reduces the amount of light
entering the MOS sensor to 1/16.
4
1/64
Reduces the amount of light
entering the MOS sensor to 1/64.
9 SHUTTER switch
Use this switch to turn the electronic shutter on and off.
OFF: The electr
onic shutter is off.
ON: The electr
onic shutter is on.
SEL: Changes the speed of the electr
onic shutter.
This dial switch returns to its original position when
released. Each push in the SEL direction changes the
shutter speed.
For details, refer to [Setting the Electronic Shutter]
(page
48).
10 AUTO W/B (white/black) BAL switch
AWB: Automatically adjusts the white balance.
Set the WHITE BAL switch on the side to A
or B and use this switch to adjust the white
balance, which takes a few seconds. The
adjusted value is stored in memory.
When the WHITE BAL switch is set to PRST
and the AUTO W/B BAL switch is set to AWB
to indicate the color temperature, pushing
the AUTO W/B BAL switch towards AWB a
second time allows you to change the preset
color temperature.
ABB: Automatically adjusts the black balance.
For details, refer to [Adjusting the White Balance and
Black Balance] (page
46).