


107
File Operations
Chapter 5 Storage and Retrieval of User Setting Data
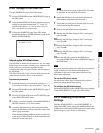
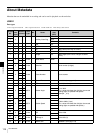
5-3-8 Storage of the OHB File
Use the <OHB FILE> page of the FILE menu.
1
Execute STANDARD on the <REFERENCE> page of
the FILE menu.
2
Using the MAINTENANCE menu, perform necessary
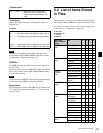
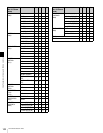
settings for the items marked with “a” in the “O”
column of the table in “5-2 List of Items Stored in
Files” for the file you wish to store.
3
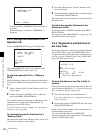
Call up the <OHB FILE page of the FILE menu,
position the pointer to STORE FILE then push on the
MENU SEL/ENTER dial.
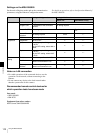
Adjusting the ND offset values
If an ND filter is attached to the matte box, etc., the white
balance may be in variance. In such a case, adjust the ND
offset so that you can retrieve the white balance
compensation value using the ND filter selection page on
the subdisplay.
The offset values ND: 2 to 5 are stored with respect to the
white balance stored for ND: 1 as the reference.
Adjustment procedure
1
Switch the camera to Custom mode, referring to “3-1-
2 Switching of the Basic Operation Modes” (page 30).
2
Execute STANDARD on the <REFERENCE> page of
the FILE menu.
3
Execute AUTO BLACK on the <AUTO SETUP> page
of the MAINTENANCE menu.
4
Connect a waveform monitor via the MONITOR OUT
HD SDI connector 1 or 2 of the camera.
5
Attach the ND filter having the lowest permeability
among the ND filters to be used with this camera, and
shoot a gray-scale chart.
Check that the lighting condition permits a video level
in the range of 560 to 630 mV to be obtained and write
down the current video level.
If a video level in the range of 560 to 630 mV cannot
be obtained, do not adjust the ND offsets.
6
Attach the ND filter to be used as the reference for
white balance adjustment and select ND: 1.
7
Adjust the iris of the lens so that the video level you
wrote down in step 5 is obtained.
8
Perform the auto white balance adjustment.
9
Replace the ND filter, change to ND: 2, and repeat
steps 7 and 8.
10
Replace the ND filter, change to ND: 3 and repeat
steps 7 and 8.
11
Replace the ND filter, change to ND: 4 and repeat
steps 7 and 8.
12
Replace the ND filter, change to ND: 5 and repeat
steps 7 and 8.
13
Store the ND offset values in the OHB file, by
executing STORE FILE on the <OHB FILE> page of
the FILE menu.
Be sure to accurately adjust to the video level you noted in
step 5. If the level is not obtained through the iris
adjustment of the lens, use the shutter function or the
master gain adjustment.
To use the ND offset values
An appropriate offset value is automatically retrieved
when you change the ND filter setting.
To initialize the ND offset values
Perform ND OFFSET on the <OHB FILE> page (subpage
of the <FILE PRESET 2> page of the FILE menu).
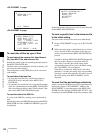
5-3-9 Resetting to the Initial
Settings
With the <FILE PRESET 1> and <FILE PRESET 2>
pages of the FILE menu, data in the modified files or the
configuration of the edited USER menu can be reset to the
initial settings, by type of files or collectively.
<OHB FILE> F06 TOP
c
STORE FILE
Note
Note