


23
Attaching a Lens
Chapter 2 Installation and Preparations
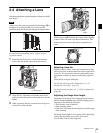
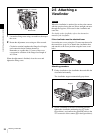
2-4 Attaching a Lens
Attach an appropriate optional lens that conforms to the PL
lens mount.
Always use a lens whose projection from the flange (A in
the figure) is less than 30 mm. Use of any lens that
protrudes more tha 30 mm will damage the internal filter.
For information on handling lenses, refer to the lens’
operation manual.
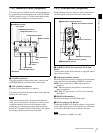
1
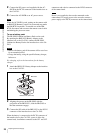
Rotate the lens fixing lever counterclockwise and
remove the lens mount cap from the lens mount.
2
Align the lens’ alignment pin with the notch in the
upper part of the lens mount and insert the lens into the
mount.
3
While supporting the lens, rotate the lens fixing lever
clockwise to secure the lens.
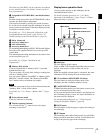
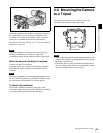
When using an ARRI LDS lens or a Cooke /i lens, align the
contacts of the lens with a hot shoe of the camera. The
camera has two hot shoes that operate completely the
same.
Selecting a lens file
With this camera, values, such as the compensation values,
which are specific to the mounted lens can be registered in
a lens file. You can perform necessary adjustments upon
replacement of lenses by merely invoking the registered
file.
Select the file using the subdisplay.
For lens file selection on the subdisplay, see “3-2-7
Selection of a Lens File” (page 37).
For details on the lens files, see “5-1 File Configuration”
(page 99).
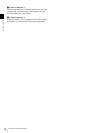
Adjusting the flange focal length
Adjustment of the flange focal length (distance between
the lens mount attachment plane and the imaging plane) is
necessary in the following situations:
• The first time a lens is attached
• When changing lenses
• If the focus is not sharp at both telephoto and wide angle
when zooming
The flange focal length for this camera can be adjusted by
rotating the adjustment screw on the front panel.
Use an Allen wrench (7/64” diagonal):
Note
C
O
N
T
R
O
L
P
A
N
E
L
V
F
2
L
E
N
S
VF1
Lens fixing lever
60
oo
5.6
8
11
1
6
C
L
2.8
2
1.6
T
ff
4
3
0
2
0
15
12
1
0
8
7
6
5.6
5
C
O
N
T
R
O
L
P
A
N
E
L
V
F
2
L
E
N
S
VF1
Notch
ROL
EL
Hot shoes